TimeTec has merged all of its solutions into www.timeteccloud.com, click to
ADVANCED SETTINGS
Learn how to set the advanced settings for your leave policy.
TimeTec Leave's Advanced Settings consists of 6 parts
 
  JOINED DATE & PRORATED LEAVE BALANCE
 
If you are using the Wizard to add new users, by default the Joined Date of these users will be set to the current date (Joined Date represents the date employee has joined the Company). This will not affect those who are added through import or added straight into the application.

The Joined Date will be relevant to the newly joined employees only during the current year because this date will be used to compute the new users' Default leave balance, provided the company applies the Standard Prorated (or another Prorated Leave Balance) method to calculate the leave balance.

• Add User through Company Setup Wizard.
 
• Import User
 
• Add User (in application's Manage User module)
 
• Joined Dates in User's Profile (Set as Current date only for Kathy Turner added through Wizard)
 Example of Application
YEAR 2017
1st Jan
57 Users
1st Apr
+ 1 New User
1st Jul
+ 1 New User
1st Nov
Sign Up for TimeTec Leave
 
User's Leave Balance Computation (Standard Prorated)
On 1st November 2017 Setup
Joined Date Yearly Allowance (days) Standard Prorated Rate % Balance (days)
1st April 2017 12 75 9
1st July 2017 12 50 6
Before 1st Jan 2017 12 100 12
 
Scenario
  • Existing company, 5 years of operation - Total of 59 employees (at 1st November 2017)
  • Sign up TimeTec Leave on 1st November 2017)
  • Users
  • Beginning of the year, 1st January 2017 - 57 existing employees (Joined the company on various dates)
  • Interval newly joined:
    1st April '17 - One employee (e.g. Employee A)
    1st July '17 - One employee (e.g. Employee B)
  • Policy
  • Annual leave - 12 days (All users) - Default Balance is Standard Prorated
  • Suggested Setup    New Setup
    1. Import all 59 users with 'Import User' function
    2. Once it is complete, go to User > Manage User > Edit.
    3. Insert the joined date for Employee A & Employee B and save.
    4. In addition, you also have to insert the joined date for remaining 57 users the same way. If this Joined Date field is left blank, the leave balance will be prorated using the current date and the data will be incorrect.
    5. Return to Wizard/ go to Leave Policy module. Apply the appropriate leave policy to all employees.
    6. For the 57 users, check that the default leave balance is calculated correctly and the full year allowance is given (i.e. Default leave balance = 12 days).
    7. Meanwhile, for Employee A & Employee B, check that the default leave balance is calculated correctly based on prorated rates. (i.e. Default leave balance, A = 9 days, B = 6 days).
    8. After this stage, the joined date will no longer affect future leave calculation for this group of 59 users.

    After Setup
    1. Following the implementation on 1st Nov '17, if you add any new users into the system, please make sure that you input the Joined Date so that the correct prorated balances will be calculated.
    Additional Notes
  • In this simplified scenario, we have not taken into account the leaves taken by employees during the year. New subscribers can use the 'Import Leave Taken' function to arrive at an updated current 'Balance'.
  • Moreover, for your 1st year setup (e.g. year 2017 as used here), you can also use our 'Import User Balance' function which will supersede what is computed using 'Default Balance' & 'Import Leave Taken'.
  •  
    Company uses a General Policy (Annual leave - 12 days, Default balance - Standard Prorated). This will be the policy applied to all users.
     
    For the General Policy used, the Default Balance is using the Standard Prorated option. This template uses the percentages that are applied uniformly as shown below.
     
    After the Joined Date is updated and leave policy is applied to Employee A on 1st November 2017, the prorated Leave Balance will be as shown below
    Employee A (Joined 1st April 2017)
     
    Similarly, after updating Joined Date and applying the General Policy on Employee B, the prorated Leave Balance will be 6 days as shown below
    Employee B (Joined 1st July 2017)
     Prorated Leave Balance
    Referring to the example above, if instead of using the system's default 'Standard Prorated' option, you wish to use different rates, this can be done at Leave Settings > Prorated Leave Balance.

    At Prorated Leave Balance page, click the 'Add button'.
     
    Insert Name and also choose whether to 'Set the percentages manually' or 'Set the percentages uniformly'. If you choose to set manually, key in the percentages based on your preference. Otherwise, choose to 'Set the percentages uniformly' whereby the system will automatically fill in percentages that are distributed evenly. After you're done, click Submit.
     
    Once you have created the new Prorated Leave Balance Option, you'll see that as additional option that appears in your Leave Policy's Default Balance column.
    Back to top 
     
      APPROVAL METHOD
     
    The system offers 3 Approval Methods and the settings of each method can be customized for each user at Manage User > Settings > Approval Method. The settings will determine the personnel to be notified and authorized to approve a user's leave.

    There could be more than 1 approver for a particular user’s leave application based on the method chosen. Refer to the scenario below for an example of applying each of the 3 different methods.
     
    Approval Method Prerequisite Setup Number of Approver(s)
    Any Admin Manage Admin & System Roles Depends on the number that the Admin configured; At least System Admin
    Immediate Supervisor Hierarchy Chart Depends on specific supervisor(s) selected from hierarchy; Possible more than 1 approver
    Specific Sequences None More than 1 approver
     Example of Application
    Scenario
  • 6 users - Employees A, B, C, D, E, F
  • 2 Departments (Division) - each managed by a HOD/Supervisor: Employees A & B
  •  
    Scenario Approval Method User Defined Approver(s)
    A Any Admin Employee A System Admin/ Employee B
    Employee B System Admin/ Employee A
    Employees C, D, E, F System Admin/ Employee A/ Employee B
    B Immediate Supervisor Employee A No immediate supervisor (this method is not available for user)
    Employee B No immediate supervisor (this method is not available for user)
    Employees C, D Employee A
    Employees E, F Employee B
    C Specific Sequences (One example) Employee C Approver 1: Employee D
    Approver 2: Employee A
     
    Leave Settings for Employee C
     
    Scenario A - Any Admin
    To use this approval method, the following steps are applicable:
     
    1. Go to User > Manage System Roles & Admin > System Roles tab. Click Add.
     
    2. Create a System role- Admin and Submit.
     
    3. Switch to the first tab > Admin. Add both users- Employee A and Employee B as Admin and assign to the newly created System role.
     
    4. Go to User > Manage User. Click Settings under Edit column to view Approval Method for Employee C.
     
    5. Select 'Any Admin' and Submit.
     
    6. Employee C apply leave.
     
    7. Leave can be approved by Employee A/ Employee B/ System Admin.
    • Employee A/ Employee B
     
    System Admin
     
    Scenario B - Immediate Supervisor
    To use this approval method, the following steps are applicable:
     
    1. Go to User > Hierarchy Chart. Click Add, create the appropriate position levels and designation. After that, assign users.
     
    2. Go to User > Manage User. Click Settings under Edit column to view Approval Method for Employee C
     
    3. Select 'Immediate Supervisor', tick for Employee A and Submit
     
    4. Employee C apply leave. Leave can be approved by Employee A only.
     
    Scenario C - Specific Sequence
    To use this approval method, the following steps are applicable:
     
    1. Go to User > Manage User. Click Settings under Edit column to view Approval Method for Employee C.
     
    2. Select 'Specific Sequences' and from the drop down list, pick Employee D to designate as 1st level Approver. Click the + button to add a 2nd Approver, select Employee A and Submit once you're ready. You can specify more than 2 approvers if preferred.
     
    3. Employee C apply leave. Leave will first be submitted to Employee D for approval.
     
    4. Once the application is approved by 1st Approver (Employee D), it is then submitted to Employee A for final approval.
     
    5. After the request is approved by 2nd Approver (Employee A), status will be updated to Approved.
    Back to top 
     
      DEDUCTIBLE/ NON-DEDUCTIBLE LEAVE
     
    Deductible Leave is when your leave consists of a certain amount of balance for the year and leave taken is deducted from that preset balance, e.g. Annual Leave.

    Non-Deductible Leave is a type of leave which does not consist of a fixed balance for the year, e.g. Unpaid Leave/Out-of-Office.

    If you set a leave as unpaid, the leave will be made available for application based on your selected user and does not need to be assigned to any leave policy.
     Example of Application
     
    Add Unpaid Leave – Non-Deductible
    Go to Leave Type either at Wizard or within application. Click 'Add Leave Type'.
     
    Insert Name and select Non-Deductible.
     
    For non-deductible leave, you can only choose to make it available for ‘All Users' or 'Only Admin'. When you choose All Users, the leave can be applied by all employees by themselves. Instead, choosing Only Admin will allow only the Admin to apply for the leave on behalf of all users. To understand this better, let's refer to the example below, where we have added two users, Employee A (Admin) and Employee D (Normal User).
     
    NOTE: Once the Non-Deductible leave type is created, it should not be added to a Leave Policy or directly assigned to a user. This type of leave will be automatically provided to all users.
     
    If you select 'Only Admin' and the Admin is Employee A, in the system only Employee A can apply in 'Admin View'. Therefore, for Employee D (User) this non-deductible leave will not appear.
     
    Also, if you have selected 'Only Admin' and the Admin is Employee A, when Employee A login to the system, they can only apply for this non-deductibe leave when they are using the 'Admin View' instead of 'User View'. You will see how that works in the 2 following images.

    The first image is Employee A's 'User View' where he/she can only apply for own leave as a user so the non-deductible leave does not appear just like for Employee D.
     
    The second image shows Employee A's 'Admin View'. At Home > Leave Overview, by clicking on 'Apply' button, he/she can apply for all user's leave as an Admin. Over here, the non-deductible leave (Unpaid leave) is one of the leave types available for application.
     
    To expand further on the example above, we now look at the situation if for the field 'Make Available To', you select 'All Users'. If you choose this option, all normal users can apply for this non-deductible leave on their own.

    Therefore, in the Leave Application page for the 2 users, Employee A & D, unlike before, you will now be able to see the non-deductible leave appearing (Unpaid leave). Refer to the extra line for this Unpaid Leave in both user's Current Allowance/ Balance table.
     
    Next, pick an Auto Approval option. It is recommended to select 'Only Admin' if you require application by users to be submitted for approval.

    Check the remaining settings and Submit.
    Back to top 
     
      LEAVE POLICY
     
    Leave Policies are templates containing a group of leave types with its individual settings. You can create multiple leave policies and assign users to them. To create a leave policy, you start by adding the applicable Leave Type along with its allowances, restrictions, balance, calendar renewal, accrual interval and etc within the Policy. This can be done either at Leave Wizard > Leave Policy or within the application.

    By default, the Wizard provides a default Leave policy template called the General Policy which you can enable/disable. This policy comprises of default leave types that you may have added while going through the Leave Type tab in your setup.

    If the General Policy was not suitable for your company setup, or if you require additional policies, you can then proceed by clicking 'Add Leave Policy’ to customise your own policy.

    • General Policy in Leave Wizard - Choose to enable/disable
     
    • Wizard - Click 'Add Leave Policy' to create a new leave policy
     
    • Within application under Leave Settings menu - Click 'Add' to create a new leave policy
    To give you a better idea on how to use leave policies, please refer to the information below
     How many leave policies should I use?
    The number of leave policies you need is based on your company's requirements and the complexity of your leave entitlements. For instance, if you have a small number of employees with just one leave entitlement that is different from the rest, e.g. 'Work from Home' is provided only for selected staff, you can use a common policy without adding this 'Work from Home' leave type and apply that to all staff. Subsequently, you have to allocate 'Work from Home' leave to the relevant users at User > Manage User > Settings > Allowance.

    However, if this small group of employees have more than one leave entitlement that is different from the other staff (e.g. Work from Home, extra Annual leave and Paid Time Off in Lieu of Overtime), it will be more suitable to create a new policy especially for them.

    Conversely, there are some leaves that will not be applicable equally among employees but that are generally required for probably half the workforce e.g. Maternity/Paternity leaves. In this case, it is recommended to use just one policy, add both leave types in the policy and apply to all users regardless of gender. After that, go to individual User Leave Settings > Allowance to customise for each user by deleting the irrelevant leave type from their allowance.

    • User > Manage User > Settings > Allowance
     
    • Settings > Allowance - Delete irrelevant Leave type, e.g. Paternity leave for female staff
     How do I use Leave Policy to provide leaves to employees?
    Generally, the settings in Leave Policy are:
    Column Purpose
    Leave Type, Yearly Allowance, Restrictions, Request Enabled, Auto Approval Specify leave types, allowances and conditions for application
    Default Balance, Accrual Interval Specify how leave is calculated when user is first added into TimeTec, i.e. Implementation Date and for the first year
    Calendar Renewal, Upon Renewal, Accrual Interval Specify how leave is calculated for subsequent years
    Default Balance
    When an employee joins your company, they are entitled to leaves, e.g. 14 days Annual leave a year. Through TimeTec Leave, you can provide the First Year leave allowances to them in 3 different ways. This First Year leave allowance settings is made at the Default Balance column in your Leave Policy. There are 3 options for you and these differ in terms of whether you will provide the leaves to users in advance or through accruals. Use the 2nd option- Empty if you need leaves to be accrued and added to the balance available only when earned from employee's service. The other 2 options are used to provide leaves in advance.
     
    Option 1: Full
    Give the Yearly Allowance upfront, in full. This means that even if your employee starts work on 1st July, in the middle of your calendar year, you will provide them with the full 14 days leave for the first year as soon as they are added into the TimeTec application.
    Note: If you use this option, Accrual Interval should be set to None.
    Option 2: Empty
    If you need users to start with a zero balance and leave is accrued and added to the balance available only when earned from users' service, then you can choose this option. You need to use this setting in conjunction with Accrual Interval settings. With this method, you can configure so that the user gets 1.16 days for every month of service he/she completes (14 days/12 months). Therefore, user's leave balance starts with zero on the first day and every month, balance available will increase by 1.16 days. By December, he/she will receive a total of 7 days. Please refer to another part of this Setup Guide (Tip- Accrual Interval) for more explanations.
    Option 3: Standard Prorated/ Prorated Leave Balance
    If you want to give users their Yearly Allowance upfont, but in a prorated way, this is the option. Therefore, with 14 days Annual leave and user starting on 1st July, when you apply this, the user is immediately provided with prorated 7 days leave for that 1st year. Note: If you use this option, Accrual Interval should be set to None. Please refer to another part of this Setup Guide (Tip- Joined Date & Prorated Leave Balance) for more explanations.
     My company is not newly established and the employees have been with us for a while. We're new to TimeTec Leave so does the same recommendation for Default Balance settings apply?
    Based on the explanations above on Default Balance settings, you probably understand how to provide leaves to future new joiners once you get the system going. However, the settings work in a similar way if you are adding existing employees on the first day of deploying TimeTec Leave. There are just a few additional points to consider:
    Full/ Prorated
  • Irrespective of whether you have chosen Full/Prorated to provide leaves in advance, the full 'Yearly Allowance' will be added to available 'Balance' immediately, provided they have joined before beginning of the year
  • Since users may have taken leaves in the earlier part of the year, this full 'Yearly Allowance' will need to be updated to deduct leaves taken. You can use the 'Import Leave Taken' function to arrive at an updated current 'Balance'
  • What's more, you can even use our 'Import User Balance' function to directly import the current balance from your previous system. This will supersede what is computed using 'Default Balance' & 'Import Leave Taken'
  • Empty + Accrual Interval
  • For those using Empty Default Balance + Accrual Interval to provide leaves, you will basically start off with a zero balance. Most likely, users should have leaves available so you have to use 'Import User Balance' function to establish the opening leave balance.
  •  How about the settings used to provide leaves in subsequent years?
    These are the applicable settings for a company providing leaves to users in advance. Over here, we will skip the explanations on how to accrue leaves since you can refer to Setup Guide (Tip- Accrual Interval) for more explanations.
    Settings for 2nd Year Onwards (Not Using Accrual)
    Restriction
     
    Balance Required
    Allow Overbook
    Allow Pre-Book
    Accrued by Date
    Upon Renewal
     
    Reset to Full Allowance
    Carry-Over All + Full Allowance
    Carry-Over Limit + Full Allowance
    Reset to Partial Allowance
    Reset to Empty Allowance
    Carry-Over All
    Carry-Over Limit
    Carry-Over Ratio
    Accrual Interval
     
    None
    Daily
    Weekly
    Every X Month
    Semi Monthly
    Every 2 Weeks
     
    The basic steps are as follows:
    I. In leave policy settings, click to Add leave type or Edit an existing leave type.
    II. Check that you have selected the correct leave type, fill up 'Yearly Allowance' and choose 'Restriction'. Since we are providing leaves upfront, it is recommended to choose Balance Required unless you wish to allow overbooking. The remaining 2 options is crossed off as these are only applicable with accruals.
    III. Select the preferred 'Default Balance' settings.
    IV. Set Calendar Renewal which is the date that is considered first day of the year for leave administration purposes.
    V. Next, you need to configure how leave is provided Upon Renewal of each calendar year. So for example, if you selected that Calendar Renewal is on 1st Jan, you get to decide how leave is provided for this New Year and what the opening leave balance is.

    If we refer to the Applicable Settings list above, all those that include Full/Partial Allowance is applicable. For example, if you Reset to Full Allowance, an employee with 14 days of Annual leave will have the full 14 days as balance available on 1st January. The description for each option is given if you mouse over the Column Heading.

    You need to skip those options that are stricken off as they cater to users of Accrual Interval, e.g. Reset to Empty Allowance (opening leave balance is zero for new year, last year's remaining balance is forfeited).

    VI. Lastly, define the 'Accrual Interval' as None and fill up the remaining columns before you Update to save.
    • Description for 'Upon Renewal' options
     Any additional things to note?
    One last important note is this: Every time you make changes to your Leave policy that has already been applied to users previously, you need to re-apply the policy again to ensure that the changes take effect.
    Back to top 
     
      ACCRUAL INTERVAL
     
    Accrual Interval function is applicable if company policy requires that leave is accrued and added to the balance available only when earned from employee's service.

    This method is also commonly paired with an empty Default Balance setting. Under this policy settings, new recruits (and existing staff upon calendar renewal) generally start with zero leave balance and their entitlements accrue over time based on the interval period set in the system.

    To gain a better understanding, let's begin with some basic questions on Accrual Interval below:

     Where to access settings for this function?
    Basically, you will find this function in your Leave Policy. For instance, in the default General Policy, you can see the Accrual Interval column. Click Edit here to make any changes to the accrual settings.
     What is Accrual Interval? How does it relate to Default Leave Balance?
    When an employee joins your company, they are entitled to leaves, e.g. 14 days Annual leave a year. Through TimeTec Leave, you can provide the First Year leave allowances to them in 3 different ways. This First Year leave allowance settings is made at the Default Balance column in your Leave Policy.

    Accrual Interval is the method used for the 2nd item in the list below. In other words, if you want to use Accrual Interval, you need to complement that by setting Default Leave Balance as 'Empty'.

    Option 1: Full
    Give the Yearly Allowance upfront, in full. This means that even if your employee starts work on 1st July, in the middle of your calendar year, you will provide them with the full 14 days leave for the first year as soon as they are added into the TimeTec application.
    Note: If you use this option, Accrual Interval should be set to None.
    Option 2: Empty
    If you need users to start with a zero balance and leave is accrued and added to the balance available only when earned from users' service, then you can choose this option. You need to use this setting in conjunction with Accrual Interval settings (please refer to the next question - How to set Accrual Interval). With this method, you can configure so that the user gets 1.16 days for every month of service he/she completes (14 days/12 months). Therefore, user's leave balance starts with zero on the first day and every month, balance available will increase by 1.16 days. By December, he/she will receive a total of 7 days.
    Option 3: Standard Prorated/ Prorated Leave Balance
    If you want to give users their Yearly Allowance upfont, but in a prorated way, this is the option. Therefore, with 14 days Annual leave and user starting on 1st July, when you apply this, the user is immediately provided with prorated 7 days leave for that 1st year.
    Note: If you use this option, Accrual Interval should be set to None.
     How to set Accrual Interval?
    These are the applicable settings for a company using Accrual method to provide users' leaves. We can skip those that are stricken off as they are not suitable to be used with Accrual Interval.
    Applicable settings to use Accrual Interval
    Default Balance
     
    Empty
    Full
    Standard Prorated
    Restriction
     
    Balance Required
    Allow Pre-Book
    Allow Overbook
    Accrued by Date
    Upon Renewal
     
    Reset to Empty Allowance
    Carry-Over All
    Carry-Over Limit
    Carry-Over Ratio
    Reset to Full Allowance
    Carry-Over All + Full Allowance
    Carry-Over Limit + Full Allowance
    Reset to Partial Allowance
    Accrual Interval
     
    Daily
    Weekly
    Every X Month
    Semi Monthly
    Every 2 Weeks
    None
     
    The basic steps are as follows:
    I. In leave policy settings, click to Add leave type or Edit an existing leave type.
    II. Check that you have selected the correct leave type, fill up Yearly Allowance and choose Restrictions. Since we are not providing leaves upfront but accruing the leave as time goes by, it is recommended to choose Allow Pre-Book to give users more flexibility in applying leave. This means that at the point of leave application, even if users have zero leave balance, as long as they are still expected to accrue the leave in the upcoming months before year end, they are allowed to apply up to the number of days that will be earned.
    III. For Default Leave Balance, you should select Empty.
    IV. Set Calendar Renewal which is the date that is considered first day of the year for leave administration purposes.
    V. Next, you need to configure how leave is provided Upon Renewal of each calendar year. So for example, if you selected that Calendar Renewal is on 1st Jan, you need to decide how leave is provided for this New Year and what the opening leave balance is.

    If we refer to the Applicable Settings list above, all those that include Full/Partial Allowance has been striked out. This is because those options will give the users their Yearly Allowance all upfront which is not in line with the concept of accruing leaves. For example, if you Reset to Full Allowance, an employee with 14 days of Annual leave will have the full 14 days as balance available on 1st January.

    Therefore, you should select your preferred option from the remaining settings, either to Reset to Empty Allowance (opening leave balance is zero for new year, last year's remaining balance is forfeited) or either one of the Carry Over options (carry over full/partial of last year's remaining leaves & current year's leave allowance effectively starts with zero balance).

    VI. Lastly, the actual Accrual Interval settings. You can specify the frequency of the accrual, whether the system will increase the leave balance every day or every 2 weeks or every month and etc. There is also a field for 'Accrual by' - use this to define the number of hours/days given to user each time the leave balance is increased. If we refer back to the example used in previous question, we can configure like this: Every 1 month(s), Day 1, Accrual by 1.16 Days, Accrue until Allowance is Full.
    • 'Accrue until' is explained in the next question.
     In Accrual Interval settings what is 'Accrue until'?
    Accrue until Definition
    Indefinitely Accrue continuously with no limit to total leave days
    Balance is Full Accrue until balance reaches the yearly allowance, therefore if there are many days carried over from last year, accrual may stop early
    Max Balance of Accrue until maximum balance reaches a specified number of hours/days
    Certain Date Accrue between 2 selected dates, you can choose both start and stop date
    Allowance is Full Accrue until the total number of hours/days the system has added for this year reaches the yearly allowance
    Max Ratio of Allowance Accrue until balance reaches the yearly allowance multiply with a ratio (e.g. 14 days x 1.2 = 16.8 days)
    Balance + Used hours equal Allowance Accrue until balance + used leave hours reaches the yearly allowance
     
    The balance used for some of the options in table above can also be customised:
    Balance Definition
    Balance to Date Balance of leave on the current date after only deducting the actual used days so far. Leave applications that have been approved for a future date is not deducted.
    Usable Balance Current number of leave days that can still be applied by user. Therefore, this will deduct both the actual used leaves that have already passed and also the applications approved for a future date.
     
    If you set Accrual Interval, you have provided instructions for the system to increase the leave balance by a certain number of days and specified the frequency for this action. However, under certain circumstances depending on your settings, you may also need to set a restriction for this accrual action and instruct the system of when to stop the accrual. For instance, if you want to accrue leaves only in first 3 quarters of the year, you can set as follows:
    With this setting, 2 days will be given on the 1st of Jan until 1st of Sept (total of 9 x 2 days = 18 days) and then accrual stops until the next calendar renewal date.
     
     Example of Application
    Scenario For demonstration purposes, we are using Accrual Interval- Daily in the scenario below
     
    Leave Type Restriction Default Balance Yearly Allowance (Days) Accrual Interval Accrual by Accrue until
    Annual Balance Required Empty 24 Daily 1 Day Allowance is Full
    Medical Allow Pre-Book Empty 14 Daily 1 Day Allowance is Full
    Hospitalization Allow Pre-Book Empty 60 Daily 1 Day Allowance is Full
     
    Add New Leave Policy - 'Accrual Interval- Daily'
     
    1. Go to Leave Policy either at Wizard or within application. Click 'Add'.
     
    2. Insert Name and 'Add Leave Type'. Go through each field and Update.
     
    3. Apply the leave policy to the relevant user(s).
     
    4. You can view Leave Policy settings that have been applied to user. In this example, we have applied the policy on [ 29th December 2017, 6pm ] to a newly created user, Employee A (Zero initial leave balance).
     
    5. On 2nd January 2018, 10am (3 days and 16 hrs later), Employee A’s leave balance will be updated as shown in the image below. Annual leave has been accrued for 2 days (30th & 31st Dec) before fully carried over to a new calendar year beginning on 1st January 2018. Meanwhile, the other 2 leave types were reset to Zero balance. The system resumes with accrual on the first day of the new calendar year.
    Back to top 
     
      SERVICE ACCRUAL
     
    The Length of Service Accruals are used to automatically increase your user's allowance/balance once they have reached a certain number of months/years of service within your company. For example, this feature can be applied if your company's policy states that once a user has served the company for more than 2 years, 4 days Annual leave will be added to their original Annual leave allowance/balance of 14 days. :
     
    • You can find this feature at Leave Settings > Service Accrual. To start using, click 'Add' to create a service accrual.
     
    • There are 2 types of Service Accrual benefits:
    A) Allowance Increase
    B) Policy Change
     
    • Setting for Allowance Increase
     
    • Setting for Policy Change
     
    The main difference between these 2 types of method is the number of leave policies involved and whether Automatic Balance Accrual is used.
    A) Allowance Increase
    Going back to the example above, let's say your company policy provides additional 4 days of Annual leave for all employees once they have completed 24 months of service in the company. Apart from that, all other leave entitlements and leave settings are equal for every user. Therefore, it is not necessary to create multiple leave policies. Due to this, you will be recommended to use the 'Allowance Increase' method.
     
    B) Policy Change
    If your leave entitlements vary significantly for groups of employees with different lengths of service (e.g. users not only receive extra 4 days Annual leave, they also get a new 7 days work from home allowance), you will most likely have to set up different policies. If that is the case, you also have to move your employee from one policy to another, once they start the 25th month of service. To do that automatically, you can use the 'Policy Change' type of service accrual. In addition, you also need to use this method if your leave settings are configured with the automatic balance accruals (Accrual Interval settings, e.g. monthly, bi-weekly). Please note that you need to first create leave policies before configuring this option.

    Example of leave policy without automatic balance accruals

     Example of Application
    Using the same example mentioned above, please refer to the following steps that illustrate how the 'Allowance Increase' Service Accrual can be applied.
     
    Add new Service Accrual (Allowance Increase): '2 - 5 Years Service'
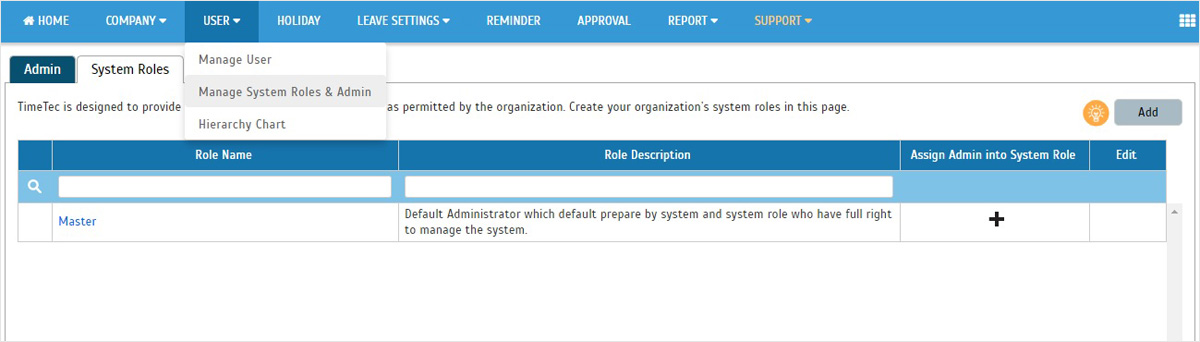
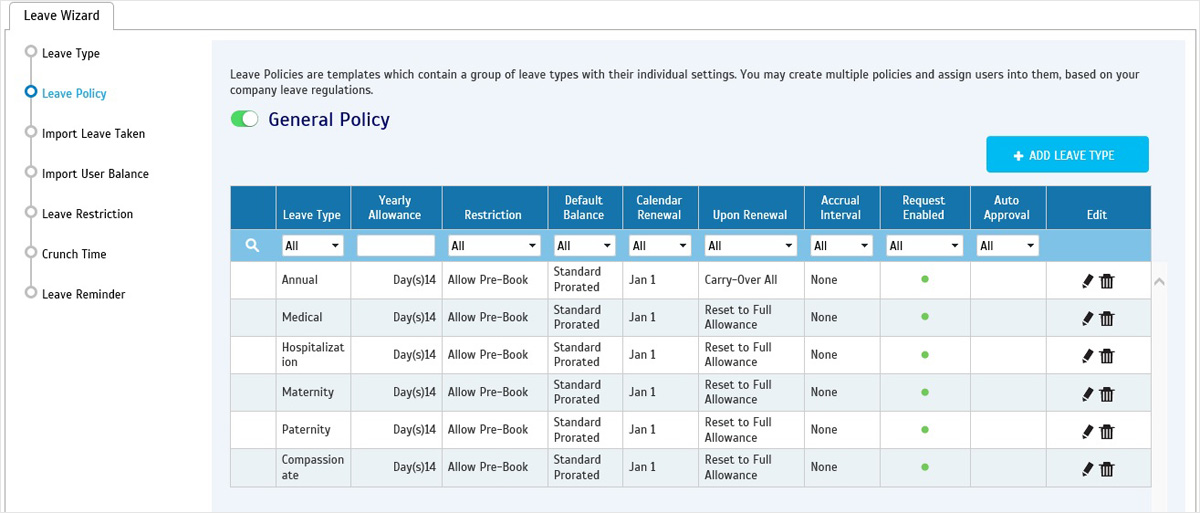
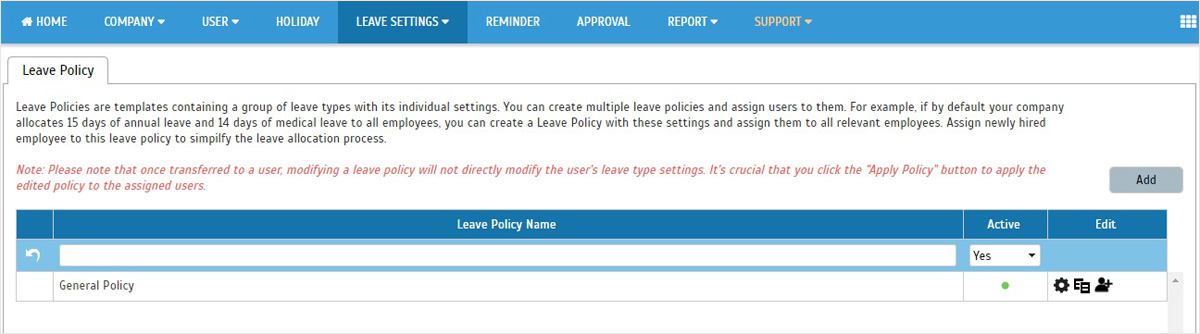
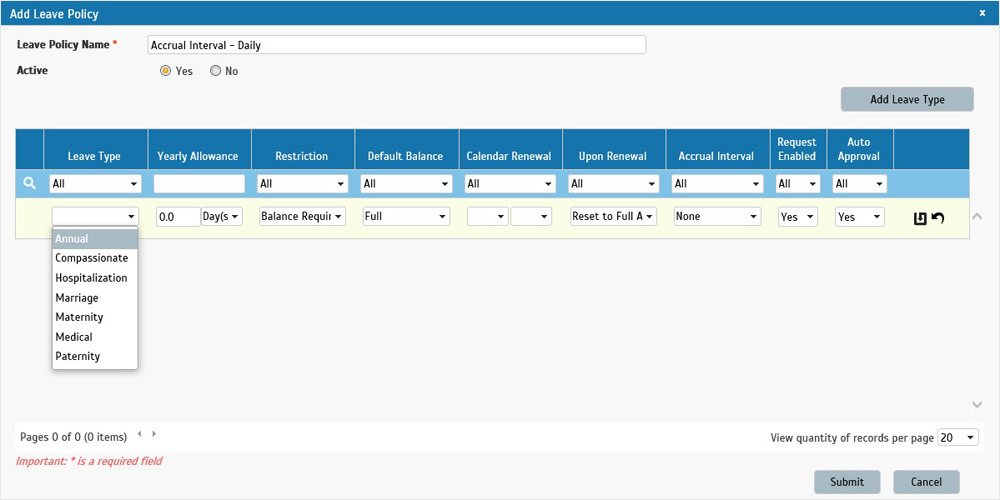
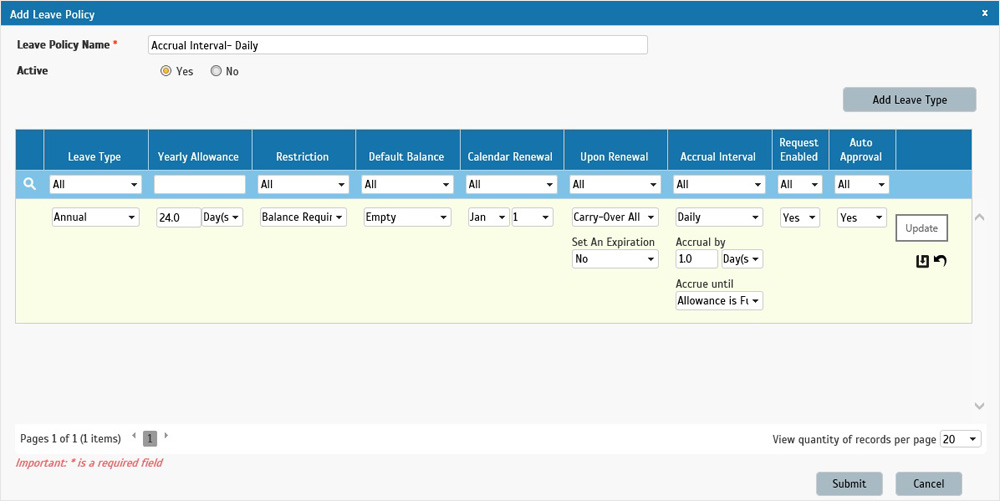
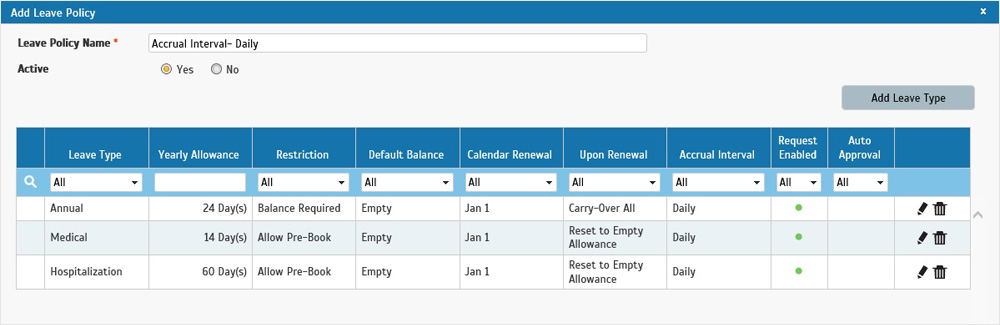
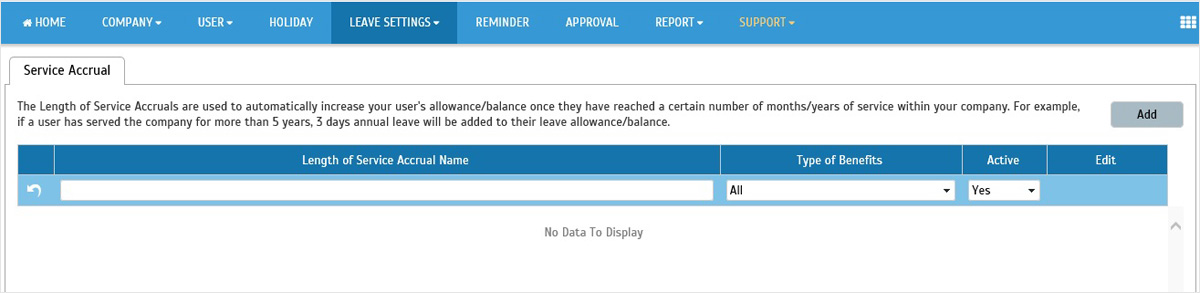
    1. Go to Leave Settings > Service Accrual. Click 'Add' to create a service accrual.

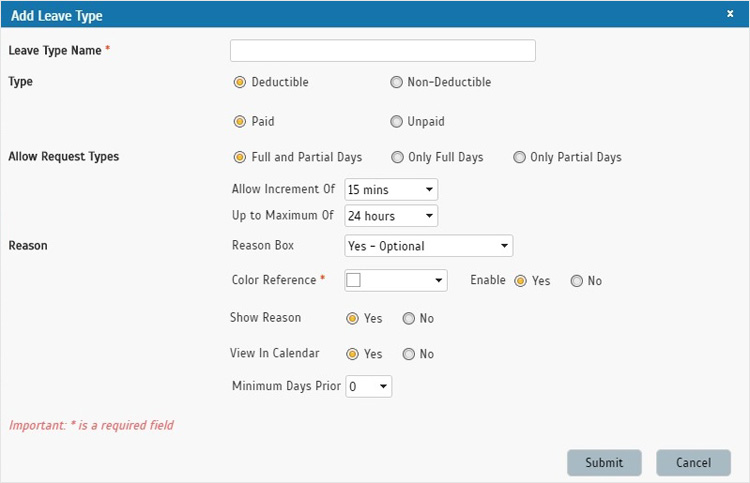
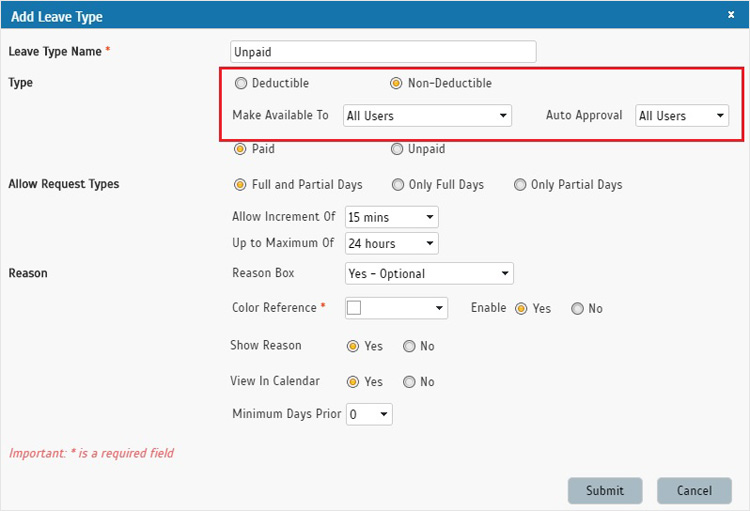
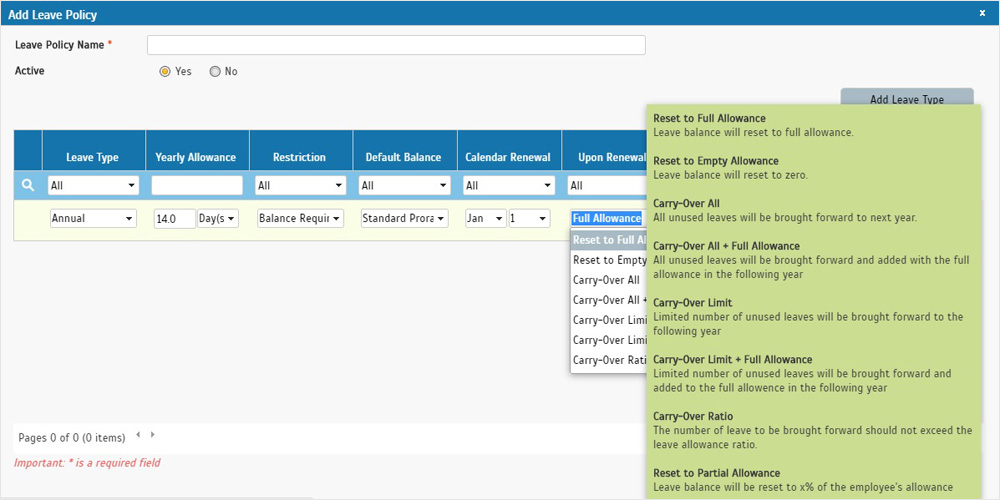
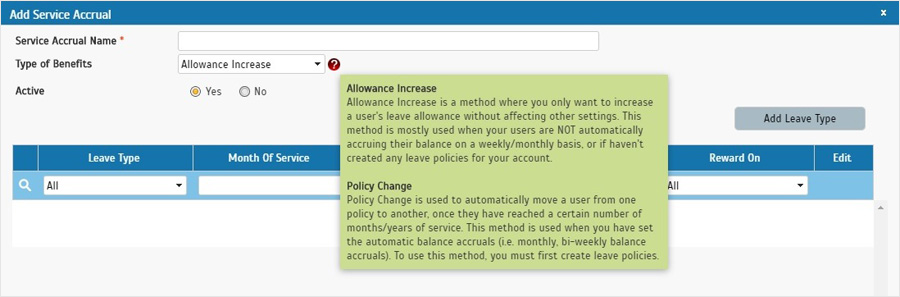
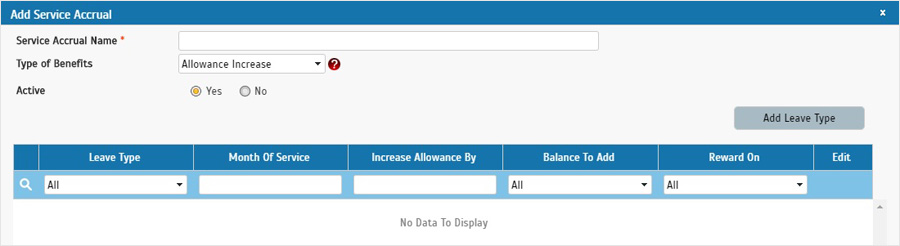
    2. Insert Name and select 'Allowance Increase' from Type of benefit drop down list.

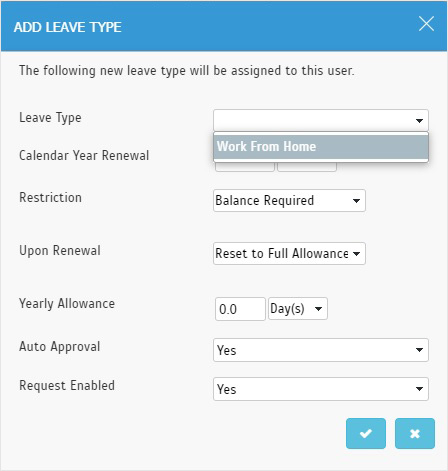
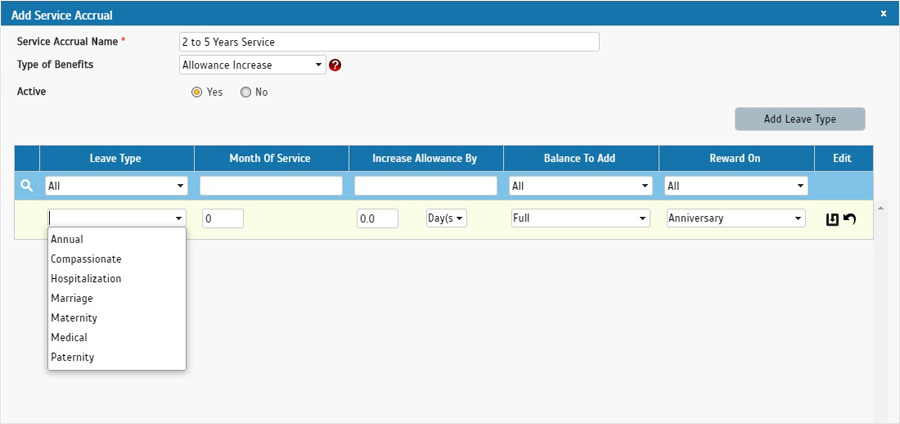
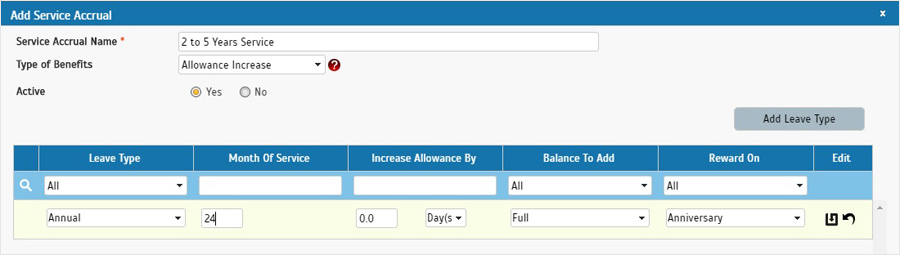
    3. Click 'Add Leave Type' and select Annual leave from the drop down list.

     
    4. In the Month of Service column, fill up the number of completed months of service that is required before the benefit is given to user. We will key in 24 here.
     
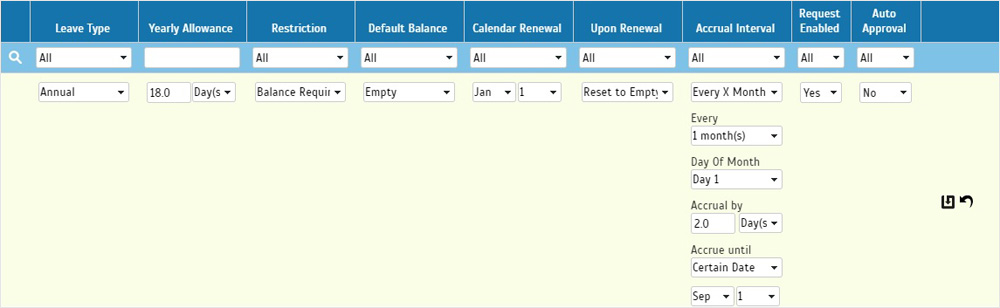
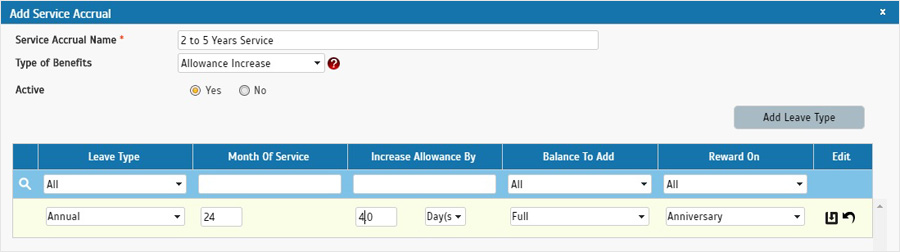
    5. Fill up 'Increase Allowance By' column with 4 days. For the 'Balance To Add' and 'Reward On' column, select Full and Anniversary. This means that the system will add 4 days to a user's Annual leave allowance and leave balance on the anniversary date that the user completes their 24th month of service. If we apply this service accrual to a user that joined the company on 4th January 2016, the system will increase their leave allowance on the employee's anniversary date which is 4th January 2018.
     
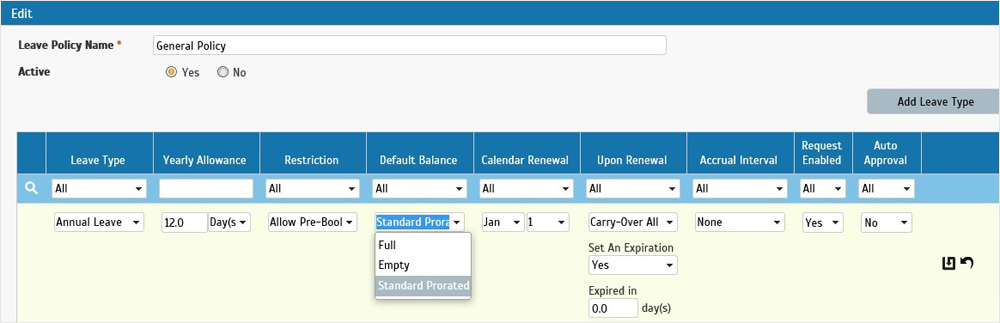
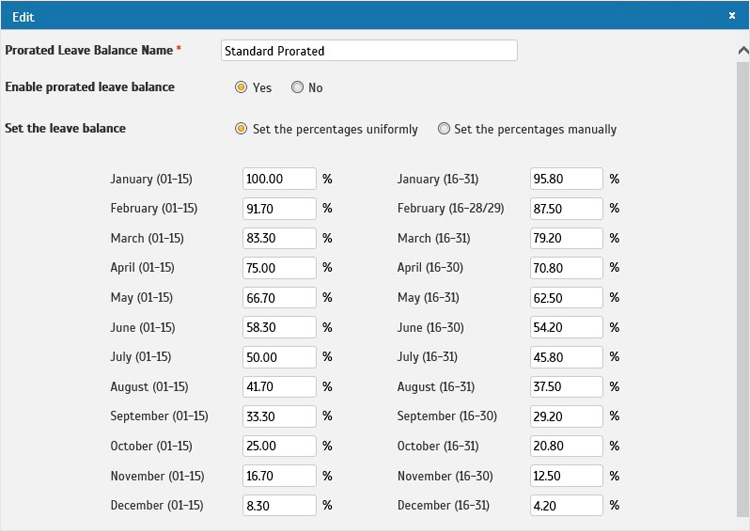
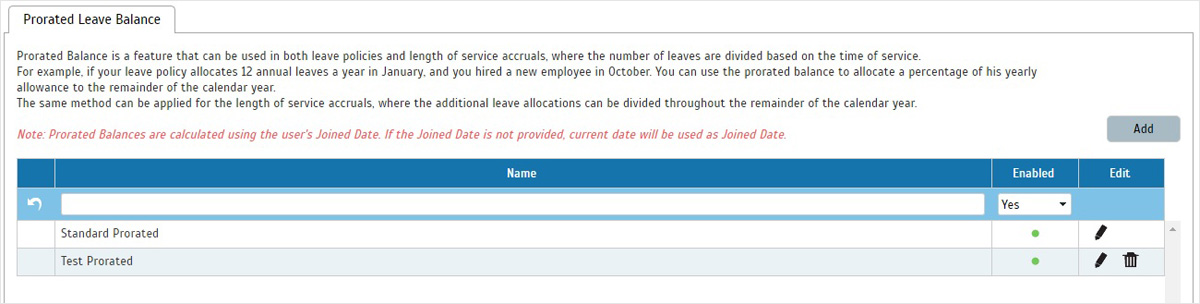
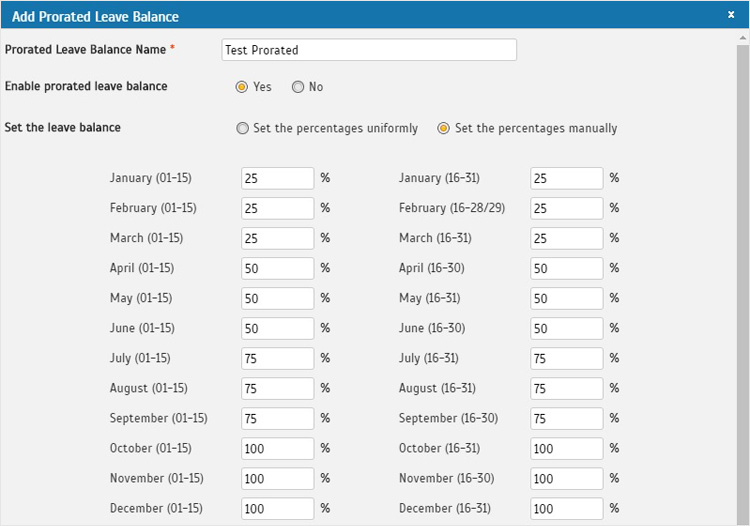
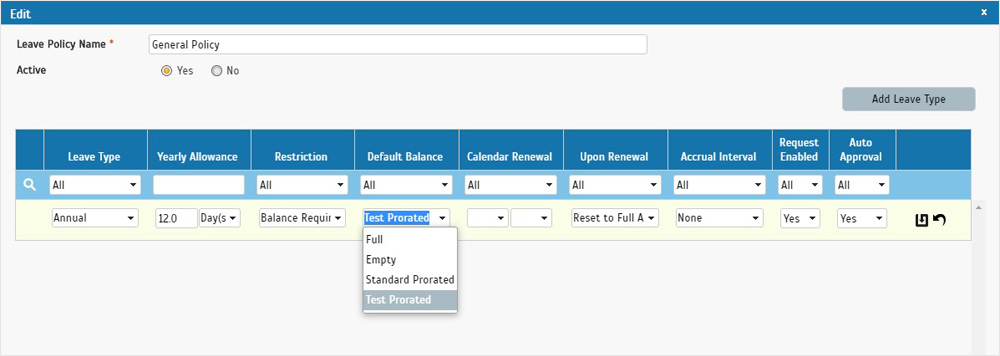
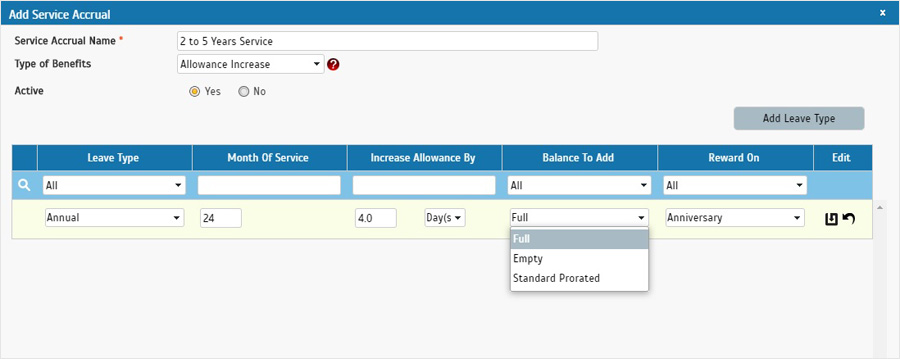
    6. In the 'Balance to Add' column, you can also choose to use 'Standard Prorated' (or another prorated leave balance). Using the same example, if you choose 'Standard Prorated', the 4 days of Annual leave will be prorated. If a user joined the company on 1st July 2016 (while the company's calendar year starts on 1st January), on 1st of July 2018 anniversary date, the system will increase the yearly allowance for user to 18 days (14 days + 4 days) while their current 2018 leave balance will be increased by 2 days ( 50% x 4 days ).
     
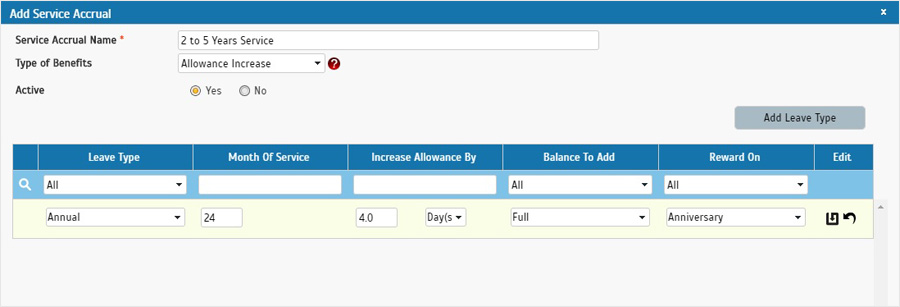
    7. After the requirements are configured, press Update and then Submit.
     
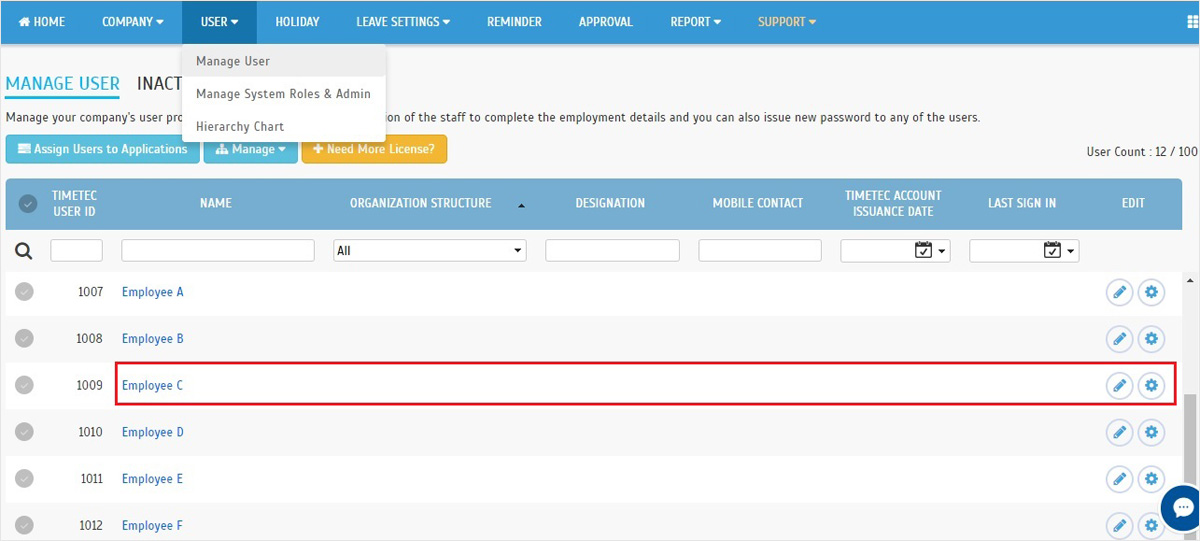
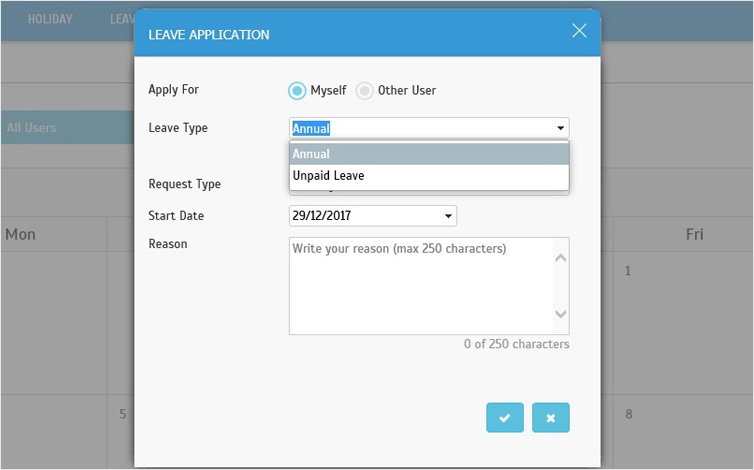
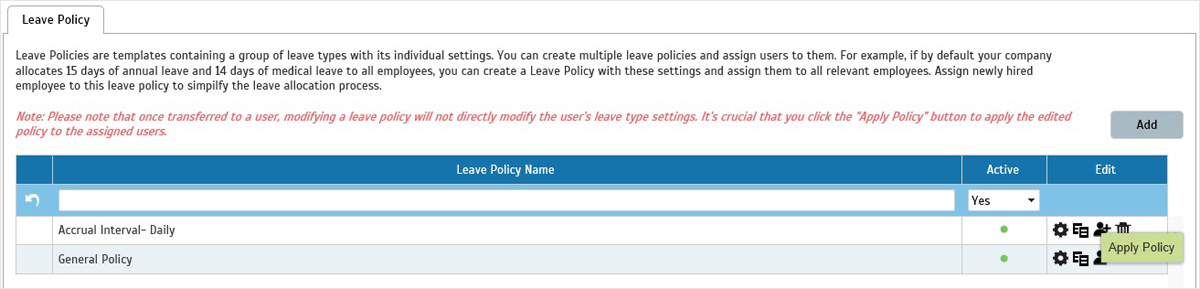
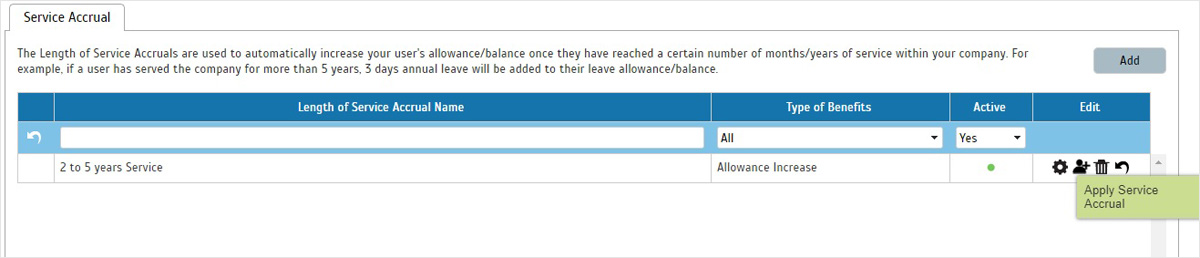
    8. Once it is created, apply the Service Accrual to user(s).
     
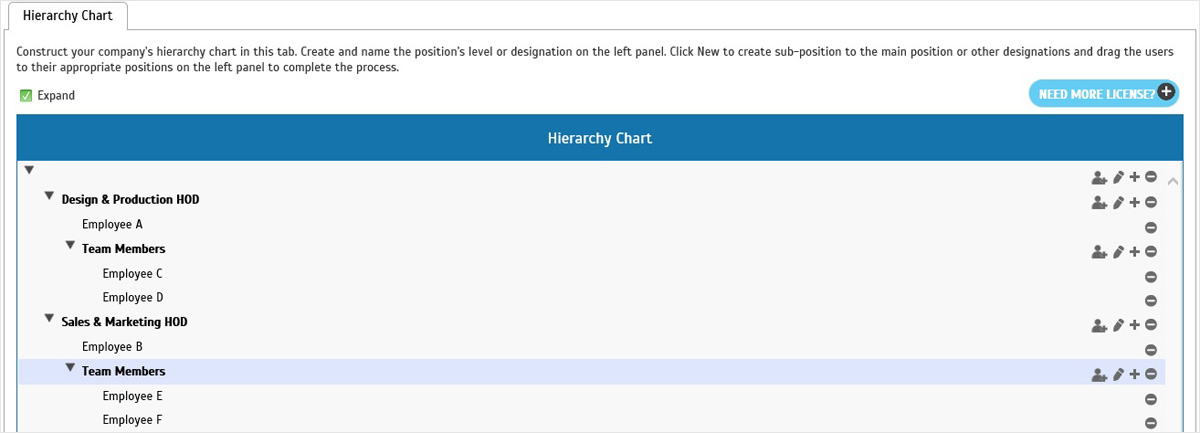
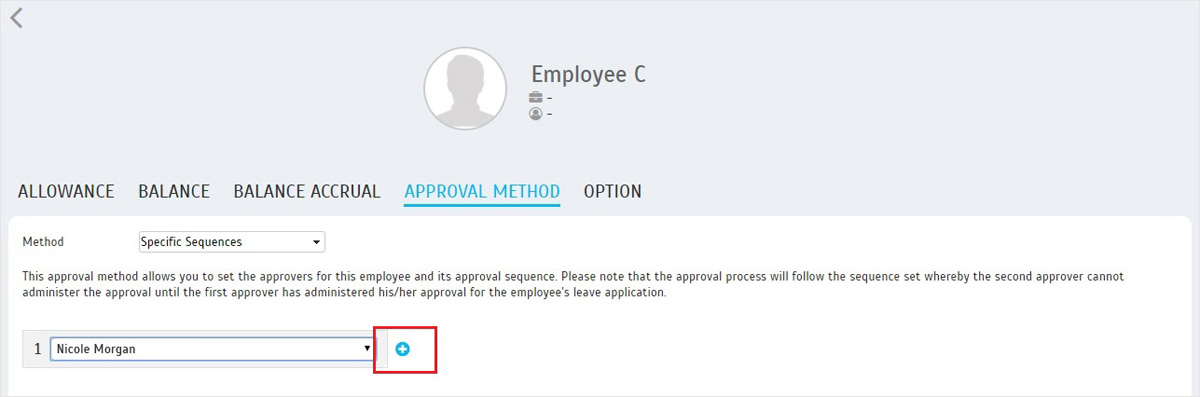
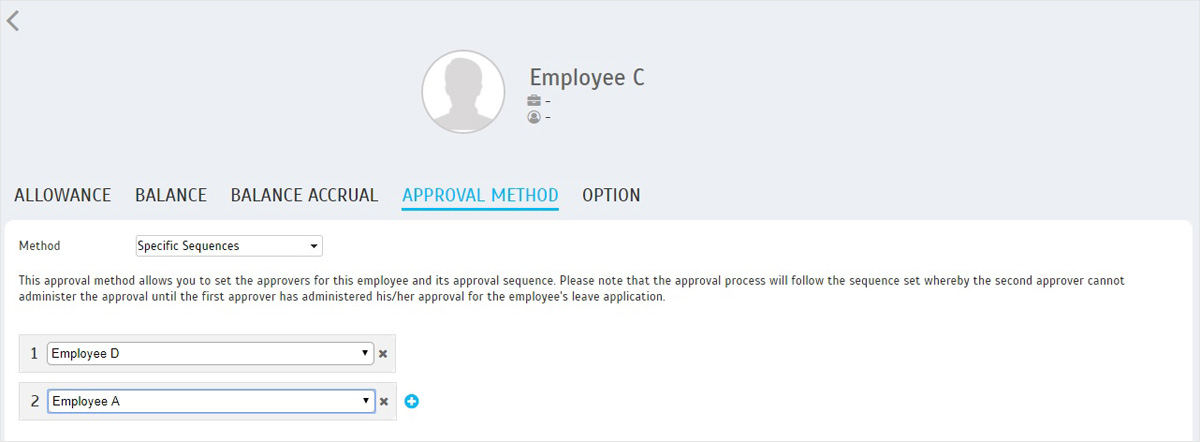
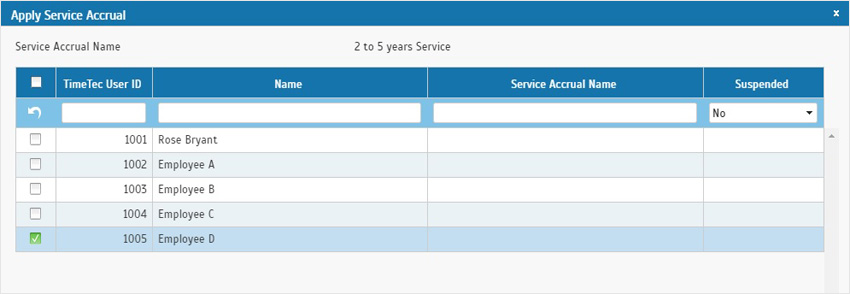
    9. Here, we will select to apply this to Employee D.
     
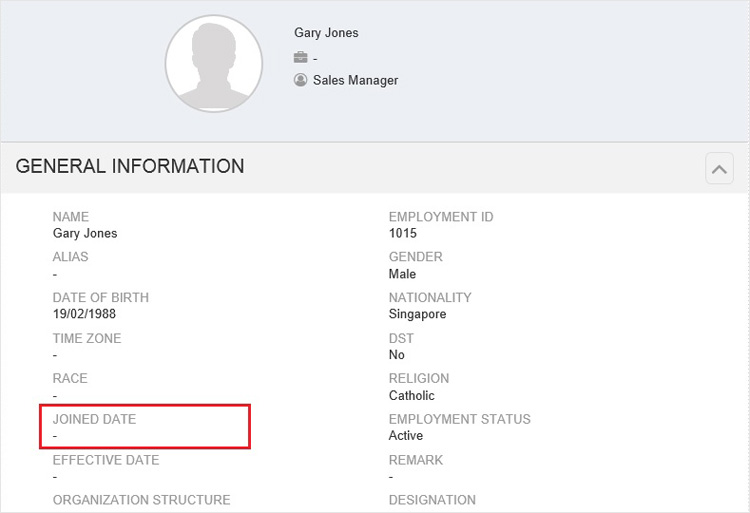
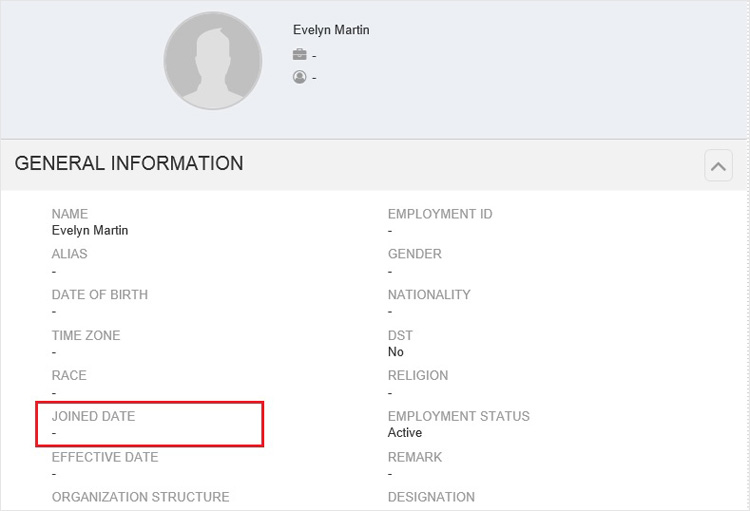
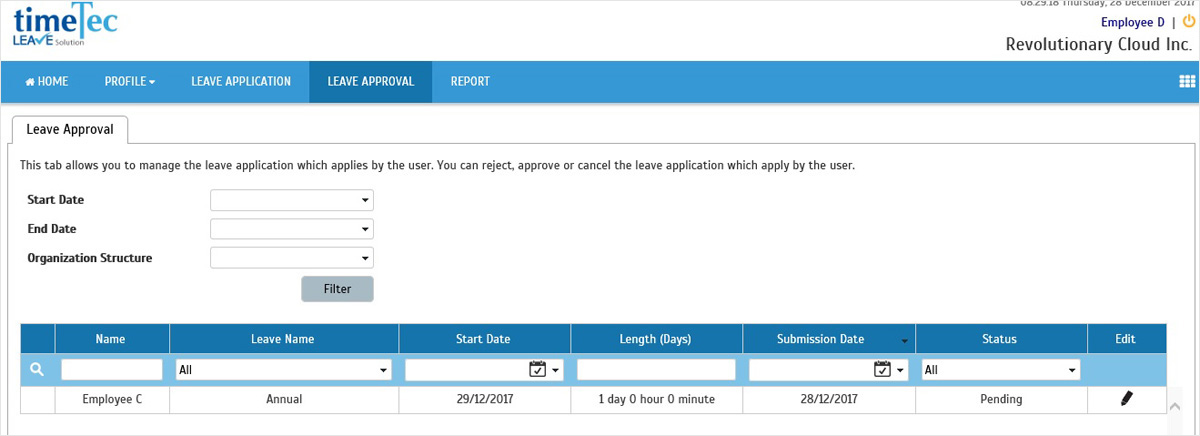
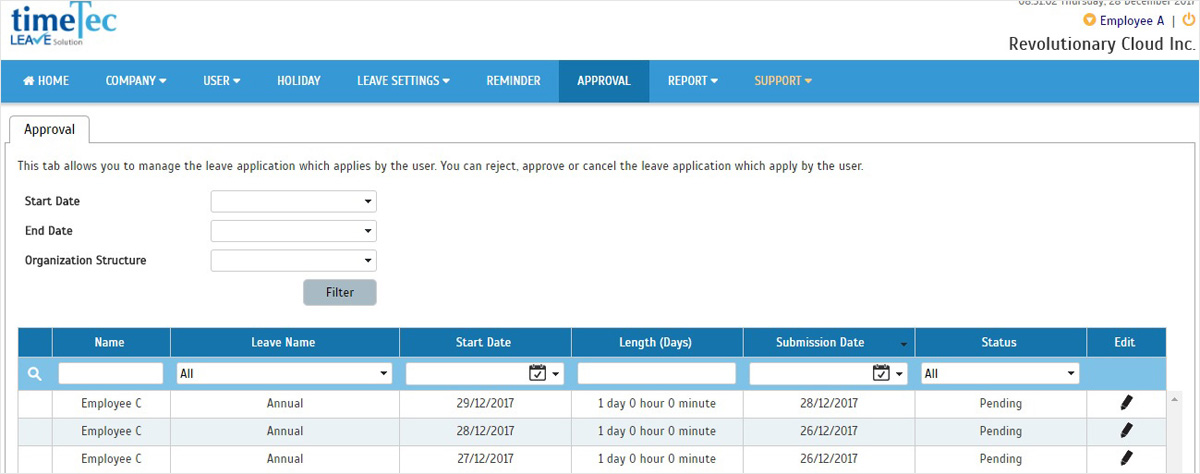
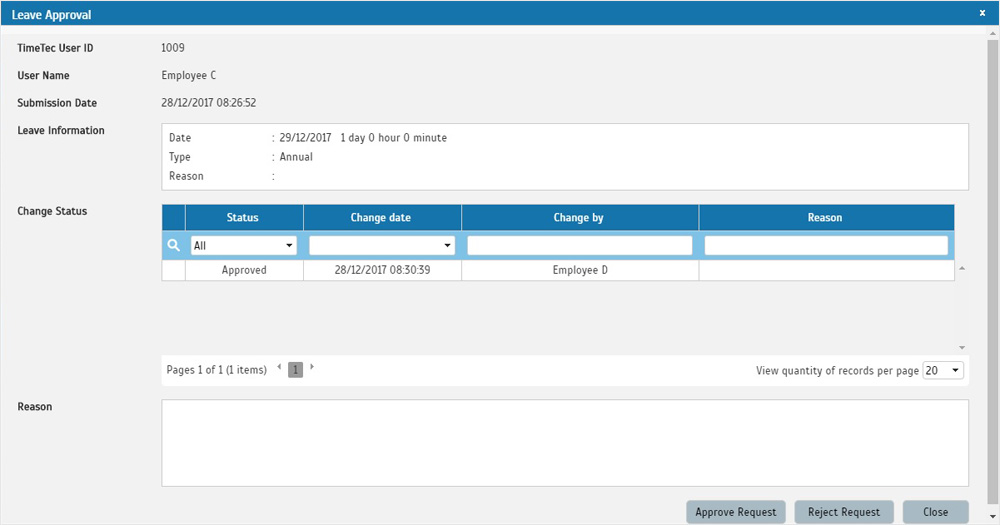
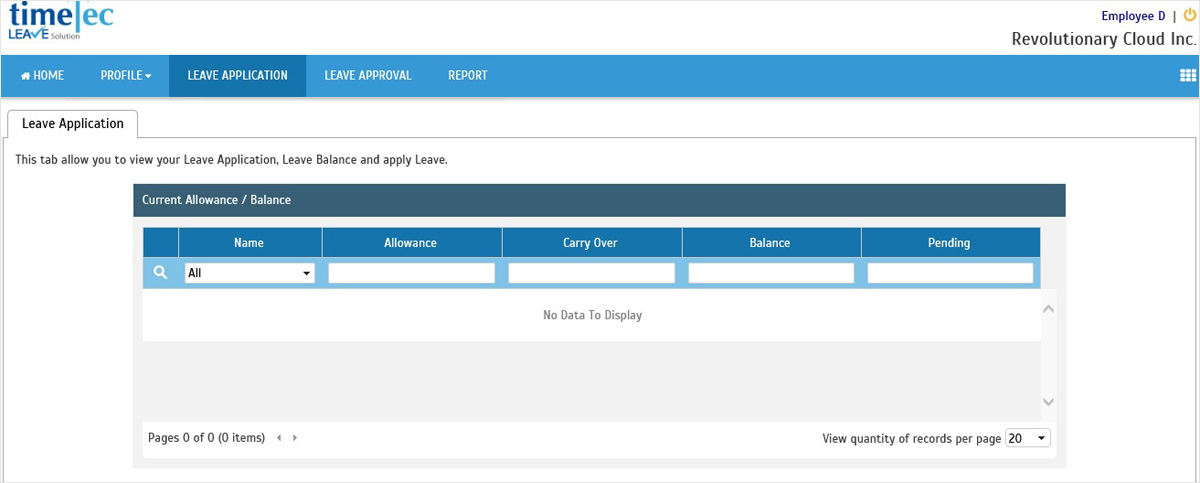
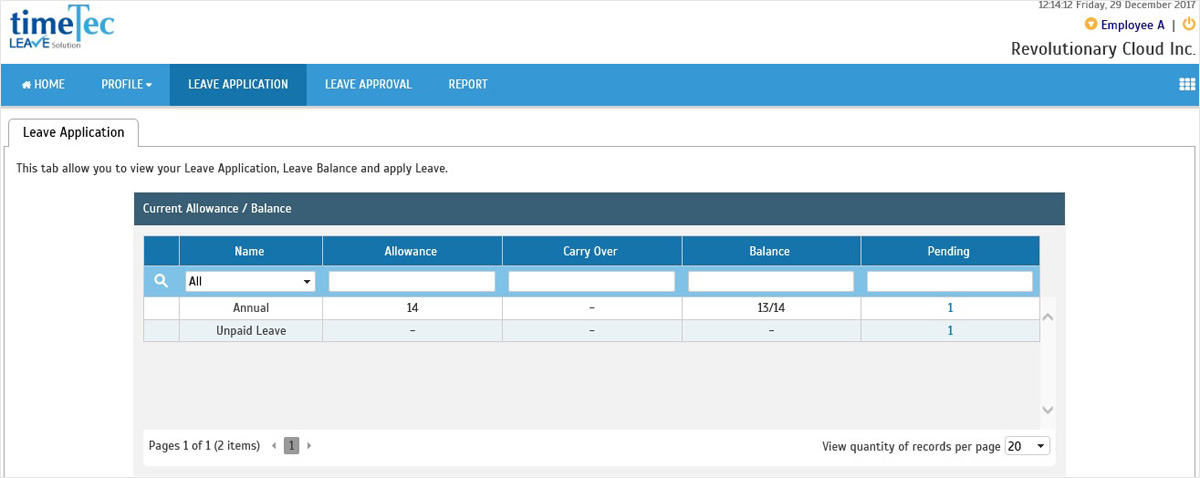
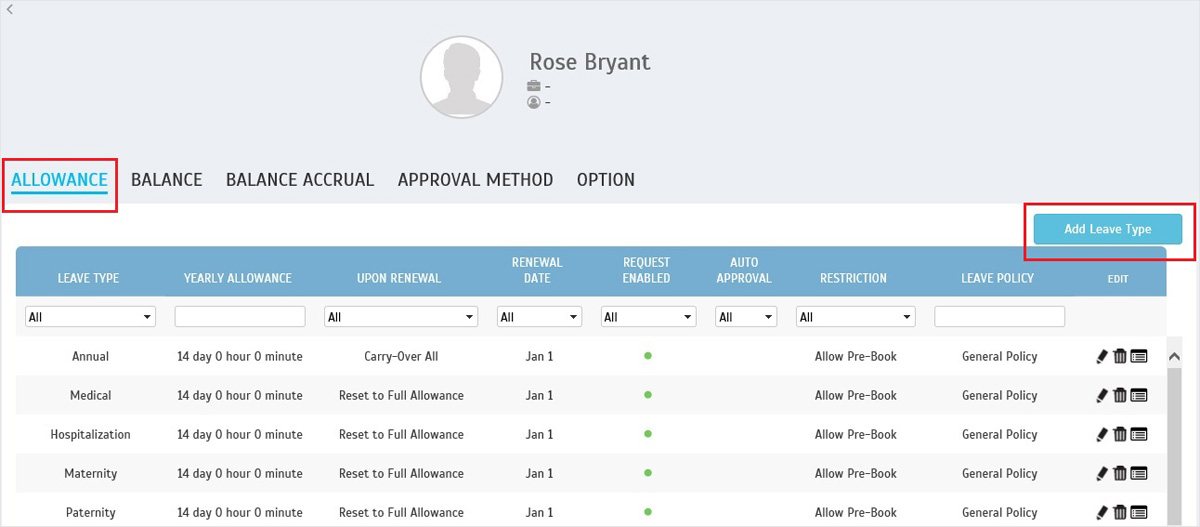
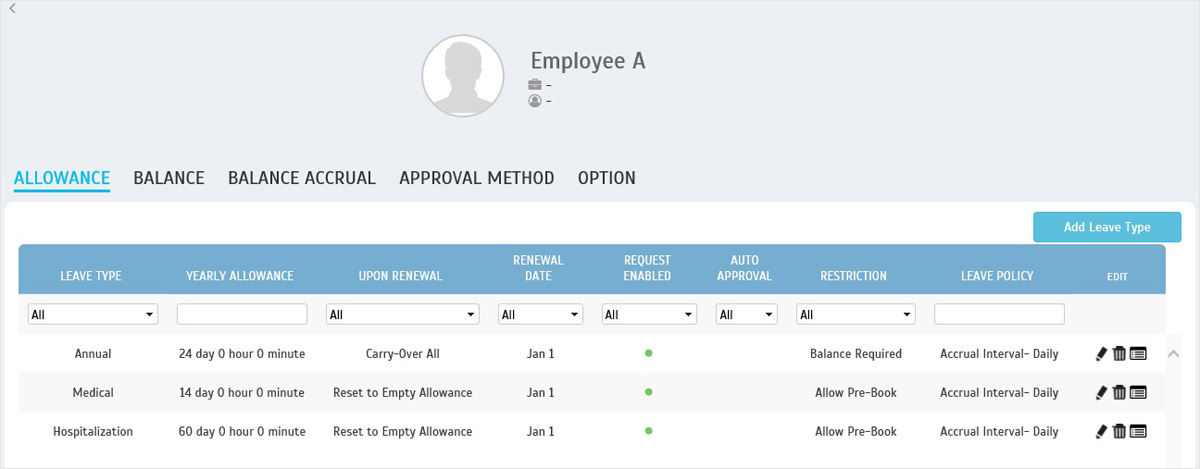
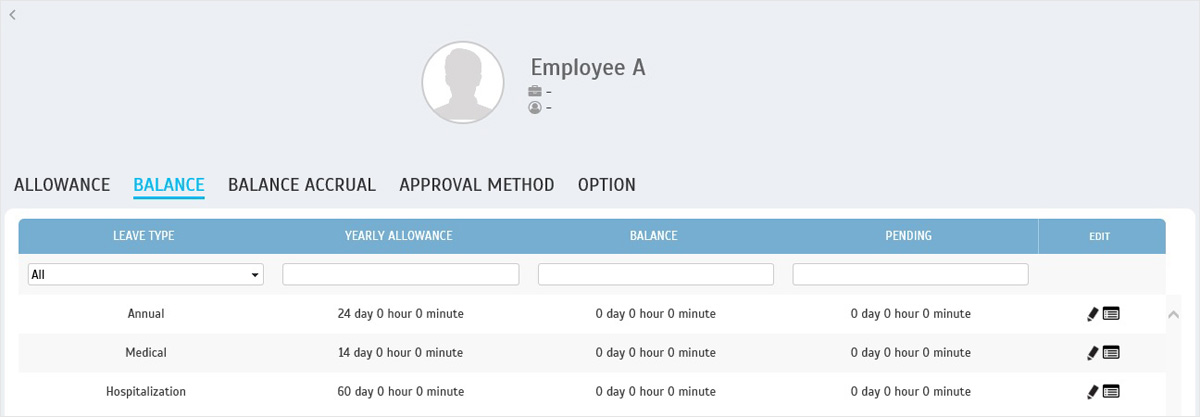
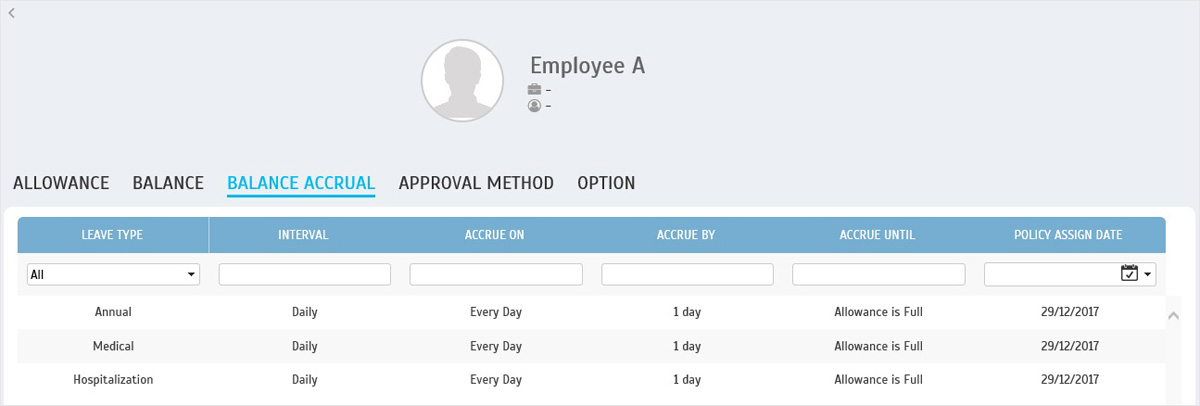
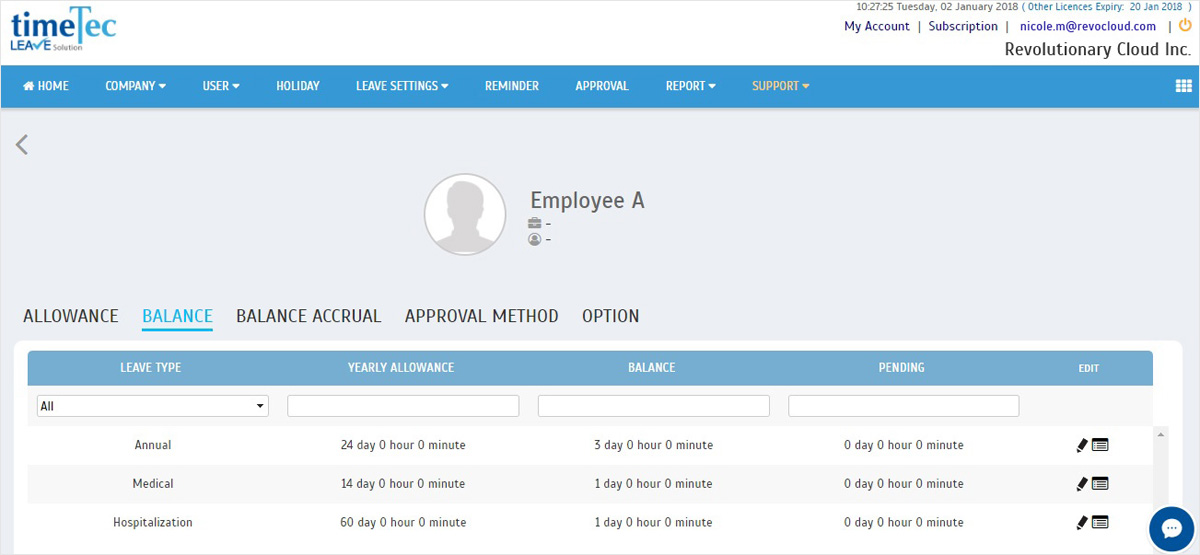
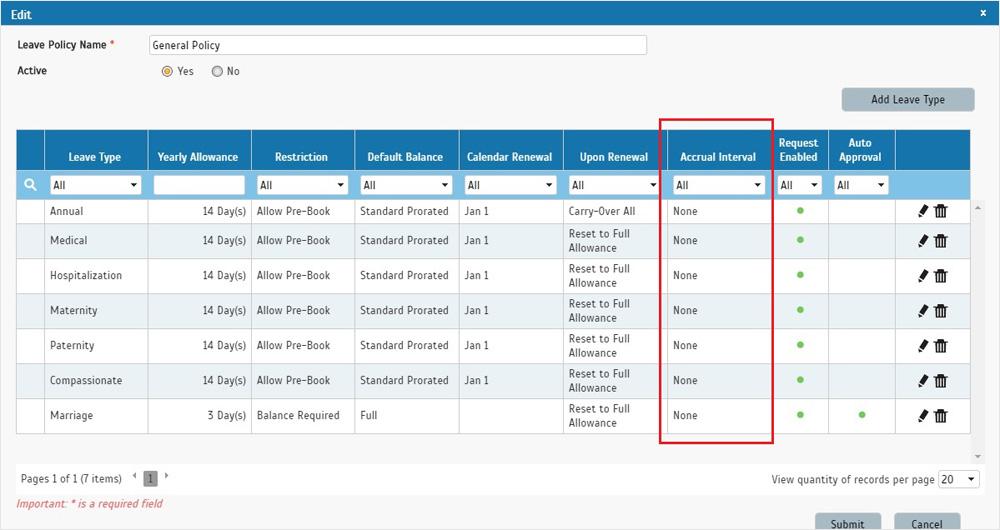
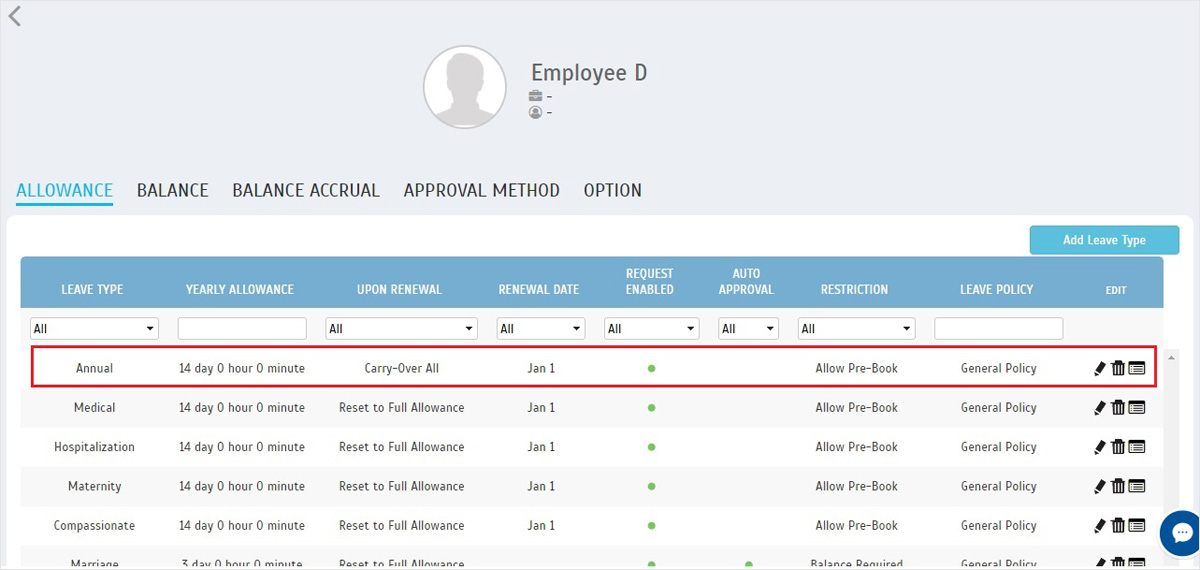
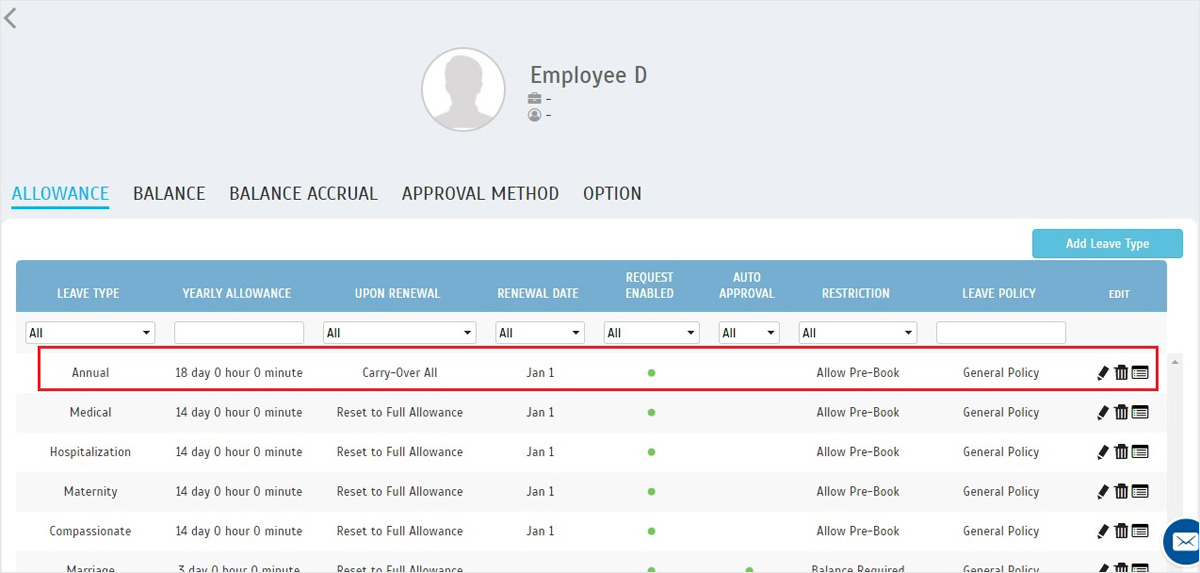
    10. Employee D has a Joined Date of 4th January 2016. At the start of the year 2018, for example on 2nd January 2018, by visiting User Leave Settings at User > Manage User > Settings, we can view the leave allowances and balances. We can see that the original Yearly Allowance for Annual leave is 14 days.
     
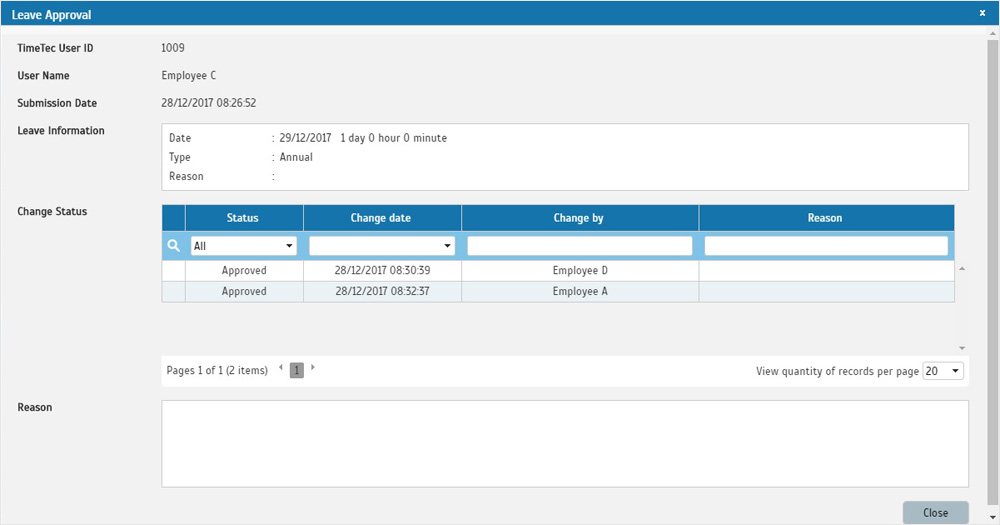
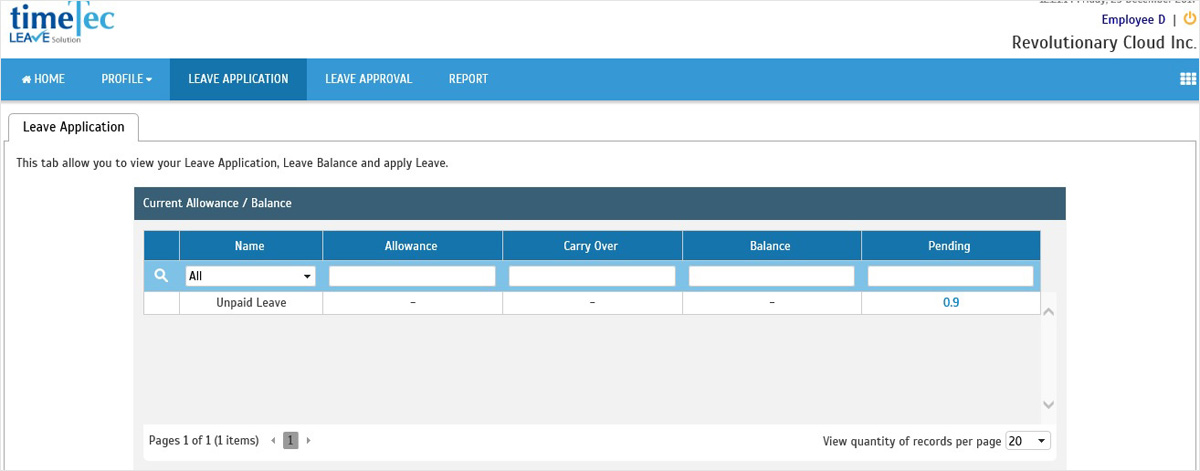
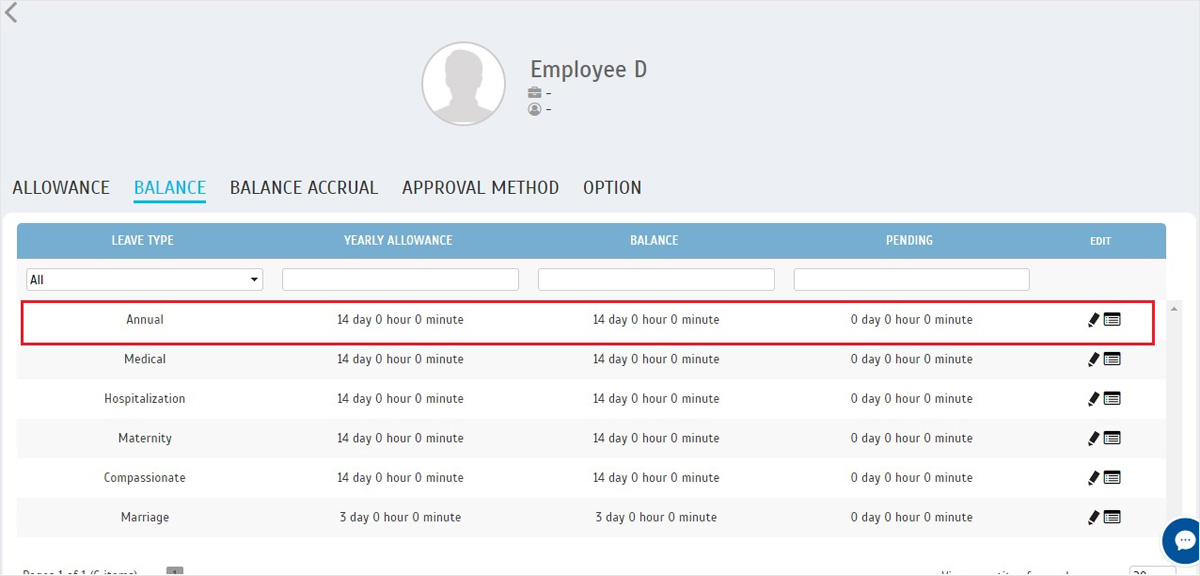
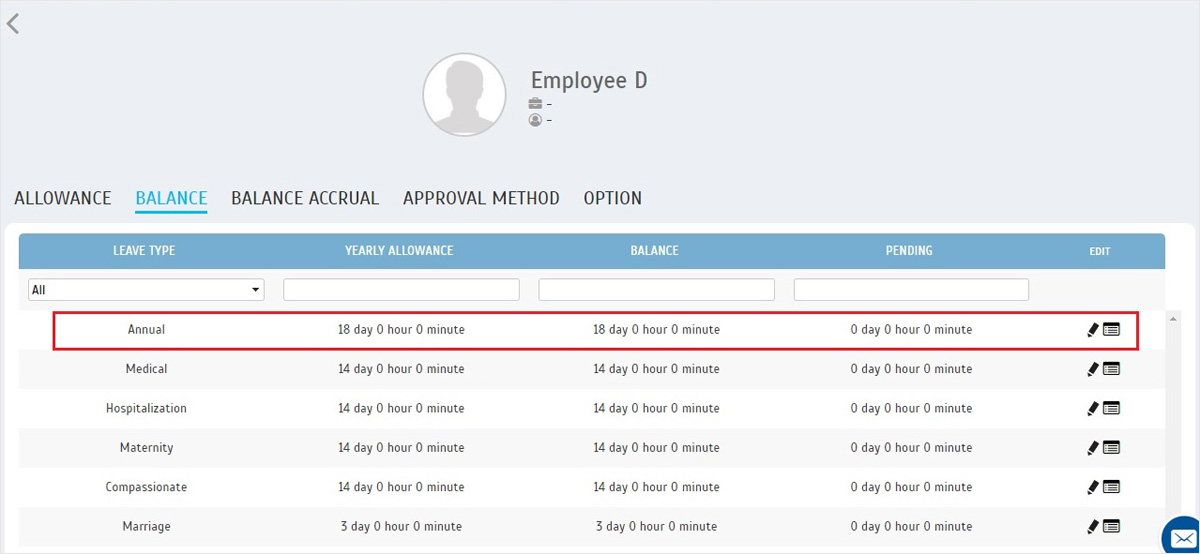
    11. On Employee D's Anniversary Date - 4th January 2018, the system will automatically increase the Yearly Allowance and leave balance for Annual leave to 18 days (14 days + 4 days). You can see the changes made in the following images.
     
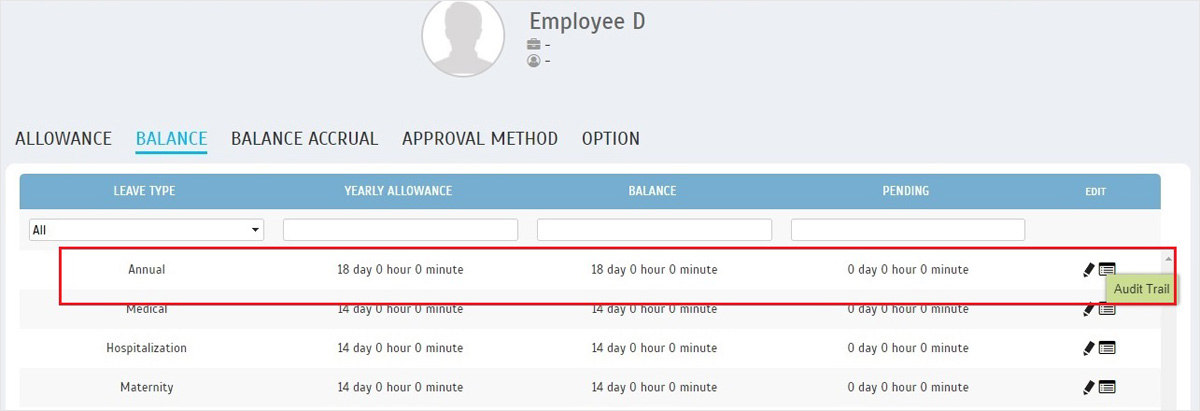
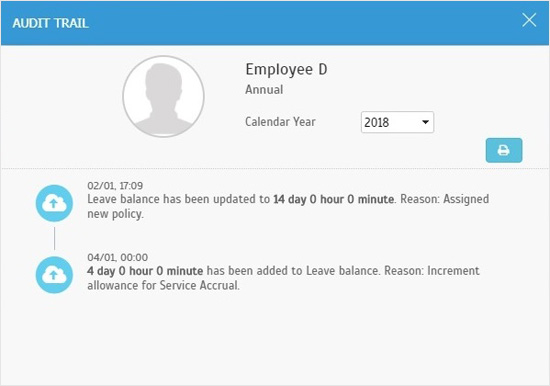
    12. To obtain more details on the changes made by the system, in TimeTec Leave there is an Audit Trail button for every leave balance. This Audit Trail is available in the leave 'Balance' tab inside the User Leave Settings window we have been looking at in the few pictures before this.
     
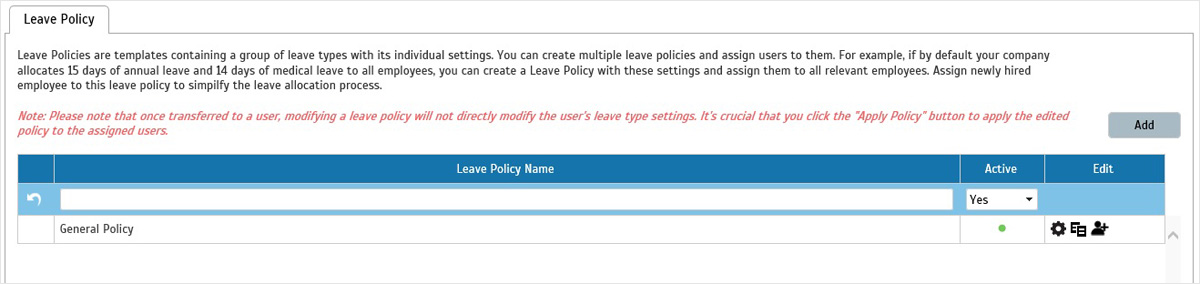
    13. Now, we have already completed a simple application example, where the company provides additional 4 days of Annual leave for all employees once they have completed 24 months of service. The settings were made using an assumption: That this is for a relatively new company (< 2 years operations) and on TimeTec Leave implementation date, all employees currently still have a service duration below 24 months.
     
    14. What happens if during initial setup, you have already been in operations for more than 2 years and have users that joined the company more than 24 months ago? For this group, you should not assign the same policy as newer staff. You also should not apply the same Service Accrual settings as the system will not be able to automatically increase the Yearly Allowance for Annual leave to 18 days. This is because their Joined Dates have already exceeded 2 years on your implementation date. Therefore, you will need to create another leave policy with Annual leave allowance of 18 days and directly apply to this group of long service staff.
     
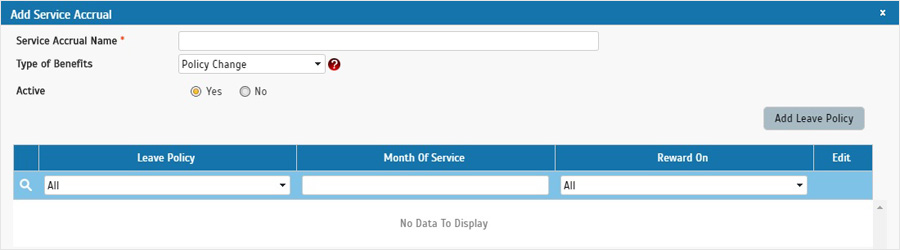
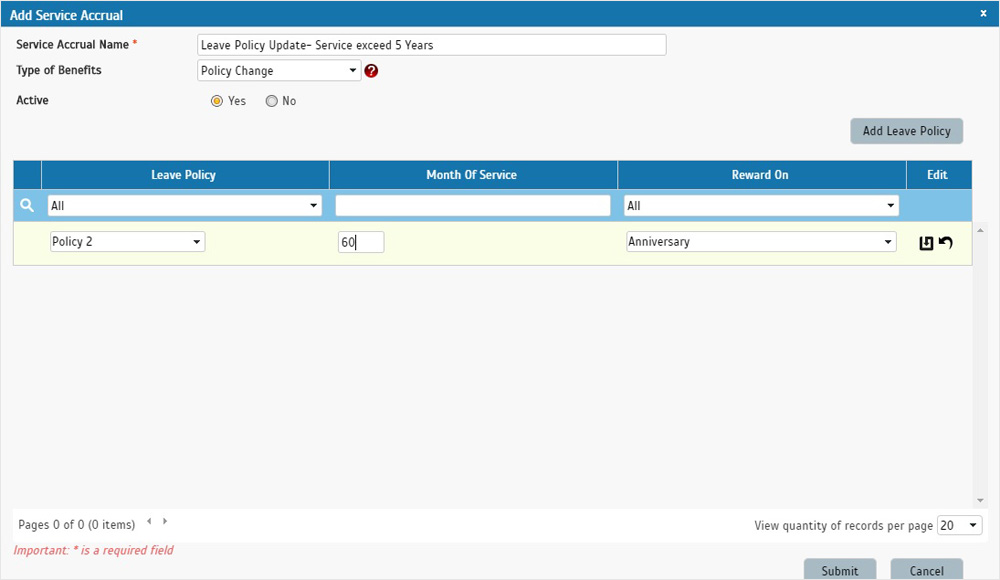
    Add Service Accrual (Policy Change)
    We have not included another detailed example for application of the 'Policy Change' option. However, the basic concept for the settings are quite similar to 'Allowance Increase' method. Take for example if you have a company operating for more than 10 years and have just signed up for TimeTec Leave on 1st February 2018. You also have 2 leave policies, Policy 1 for employees < 5 years and Policy 2 for employees > 5 years.
     
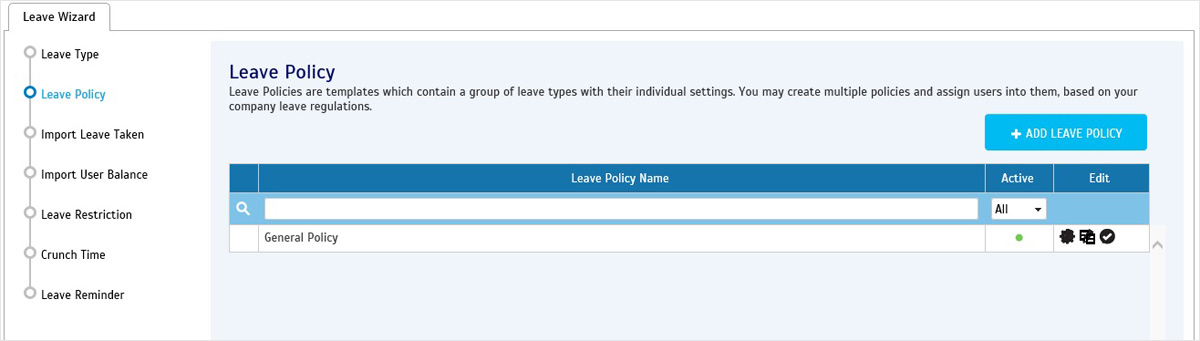
    1. If you are doing system setup and using this service accrual for the first time, you can start by making sure you have created 2 separate leave policies, Policy 1 and Policy 2.

    2. Next, check that you have applied Policy 1 to users with service less than 5 years.

    3. Meanwhile, for users with service exceeding 5 years, you need to apply Policy 2. The reason why you need to manually assign policy 2 to this group is because their Joined Dates have already exceeded 5 years on 1st February 2018, your implementation date.

    4. Next, we move to the Service Accrual settings. You need to select the advanced leave policy which is Policy 2 from the settings drop down list. Fill up 60 in the months column and choose perhaps to reward user on anniversary date.

    5. After you have created the Service Accrual, apply to users with service less than 5 years (this group is currently using Policy 1). Once this rule is in place, going forward, the system will automatically switch the user from Policy 1 to Policy 2 after they have completed their 60 months of service.